Hi and welcome to my blog. WeddingMonograms.blogspot.com was created to help DIY brides learn how to create Monograms and other wedding designs in photoshop. I hope that you find this blog helpful. Please feel free to email me with any questions or suggestions for tutorials at WeddingMonograms@gmail.com
Congratulations and Happy Planning,
BriannaNichole!


Friday, February 29, 2008

Get This Look Part I - 'The Invitation'

This tutorial is designed to create a pocketfold invitation. It should be all the steps, sizes, design, fonts and everything else you to to create this invitation. All you should have to do is download the fonts, the file,change the personal information & colors.

Note: You must have Photoshop to be able to edit and use this Invitation. I will try and come up with the design for Microsoft Word or PowerPoint, but right now it can only be used with Photoshop.

Download Invitation File

The Invitation, Reception, RSVP, Direction and Accommodation cards are all the correct sizes to be used in the Signature Pocketfold from Cards and Pockets.com.

Fonts used:
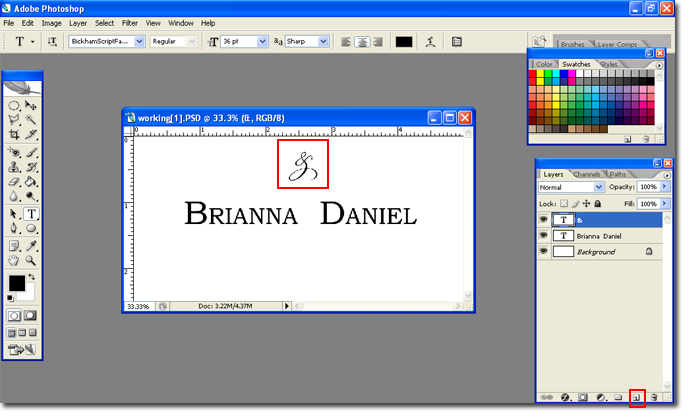
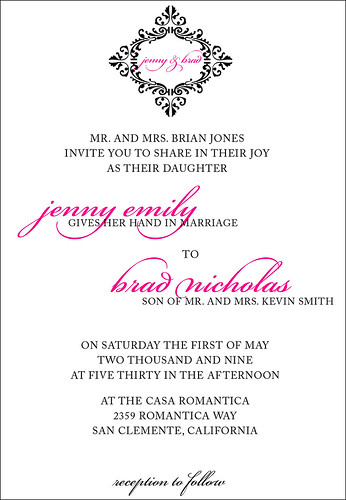
Medieval Motif II: This is the dingbat for the flourish at the top of the invitation.
Bickham fancy script: Used with Beautiful ES Script as the scrip font. This font is not free, but you can use the Beautiful Caps Script and Beautiful ES Script to create the same look.
Beautiful Caps ES
Beautiful ES
Carlos: Font used for the block letters. This font can be replaced with any block font you like.

**Note: All fonts are for PC only. Sorry Mac guys :(


Sizing - The Signature pocketfold (from cardsandpockets.com) is 5x7. The Invitation is designed to be 4.5 x 6.5 or 4.75 x 6.75, the size will depend on if you plan on having a mat behind your invitation.

**The invitation mat is a colored piece of cardstock that sits between the invitation and the pocketfolder. It is slightly smaller than the pocketfolder and slightly bigger than the invitation. Thus giving you the mat look (like on a picture in a frame)

If you have an invitation mat then the invitation will be 4.5 x 6.5, if you opt not to have one the invitation will be 4.75 x 6.5. Generally the invitation mat will be 4.75 x 6.75. You can purchase the mat already pre-cut from Cardsandpockets.com.

My invitation is created to be 4.5 x 6.5. If you wish your invitation to be bigger; simply increase the canvas size by .25 inches.


The Invitation:


Step Download the fonts and the .psd file. You will need to place the fonts in your fonts folder: My Computer > C Drive > Windows Folder > Fonts Folder.

You will need to reboot your computer before you can use your new fonts.

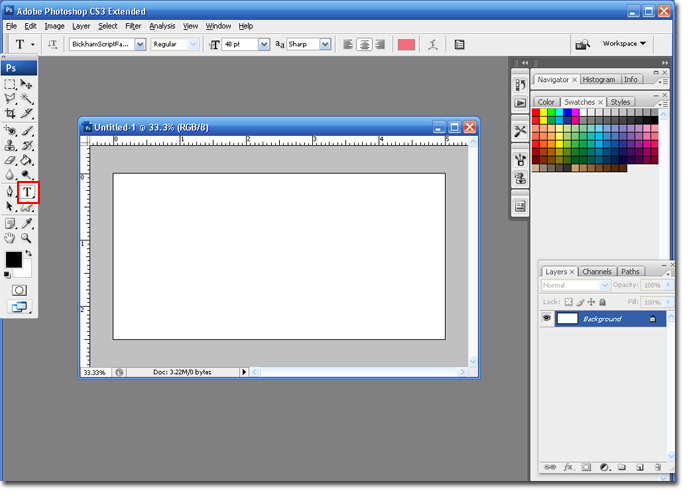
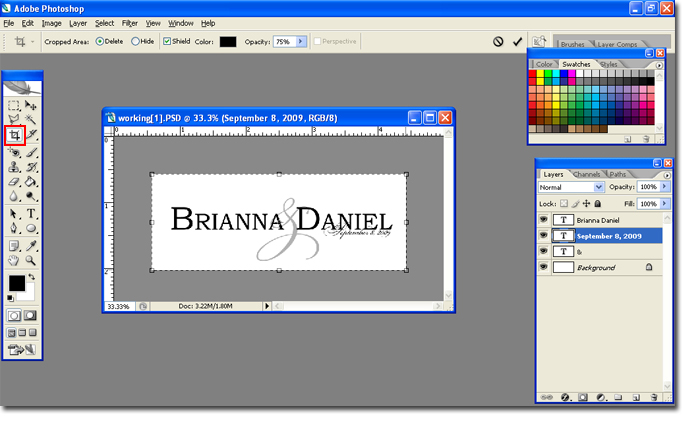
Step Open the invitation.psd file in Photoshop.


Each layer is labeled so it should be easy to see what layer you need to edit.

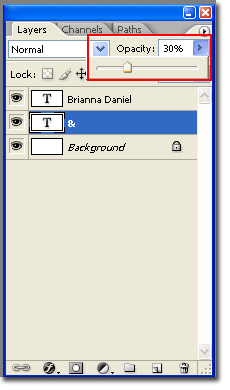
Step 2 Click on the Color Pallet tool to select the colors that you want the invitation to be. In this case I am going to use black and hot pink.


We are going to change all the color first and then customize it with your personal information.

Step 3 Select the layer you want to edit, select the Text Tool and highlight your text. Click on the arrow next to the Color Pallet tool to switch the colors. Keep switching them until the color you want is set to the foreground (i.e. The first color box).


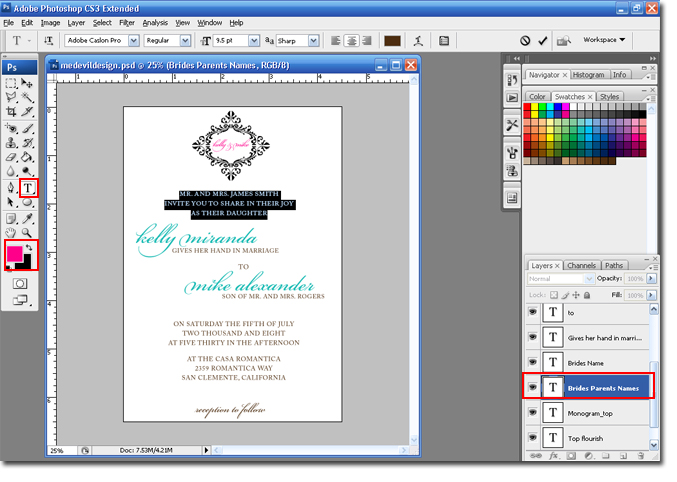
Do this with all the layers until your invitation is the colors you desire.

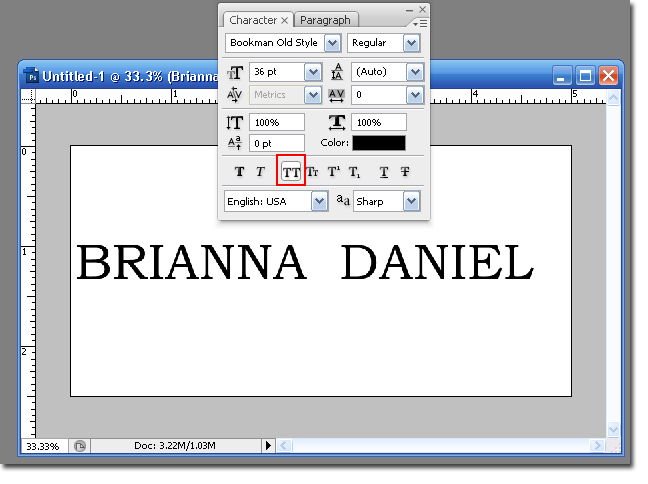
Step 4 Select the Type tool and the layer with which you want to edit the type. Highlight the text you wish to change, and type in the new text.


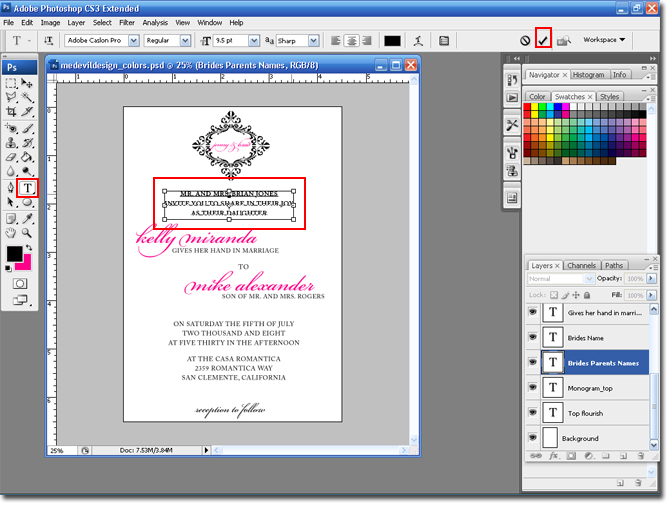
Continue doing this until the invitation has been personalized with all your information.

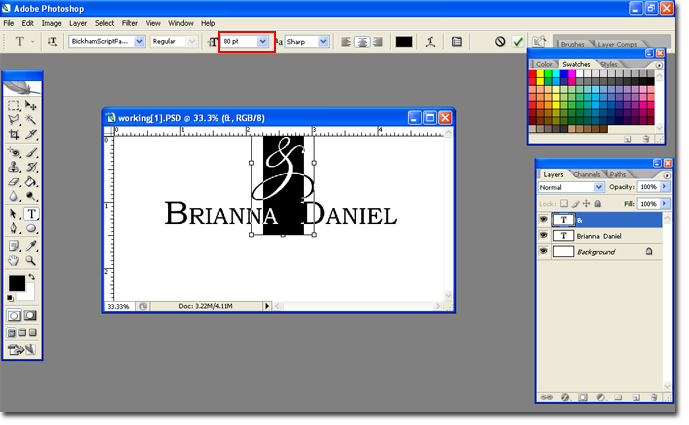
The next step is optional. If you notice the Bickham Fancy Script can be hard to read some letters. If you wish you can select certain letters and substitute the font with the Beautiful Script.


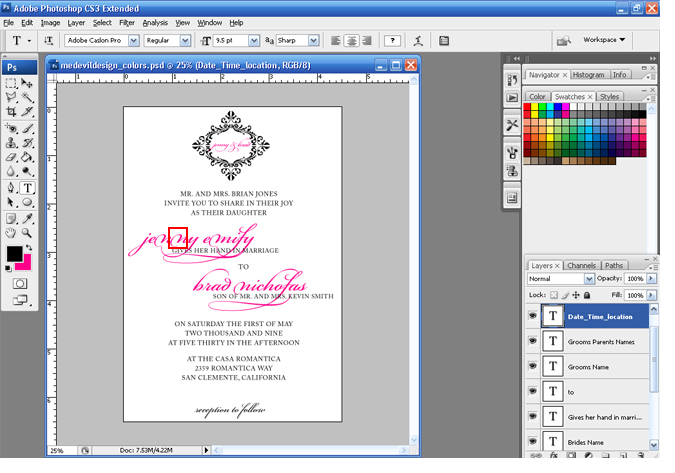
Step 5 Select the Type tool and highlight the letters you wish to edit. Click on the down arrow to change the font. When you are finished click on the Arrow.


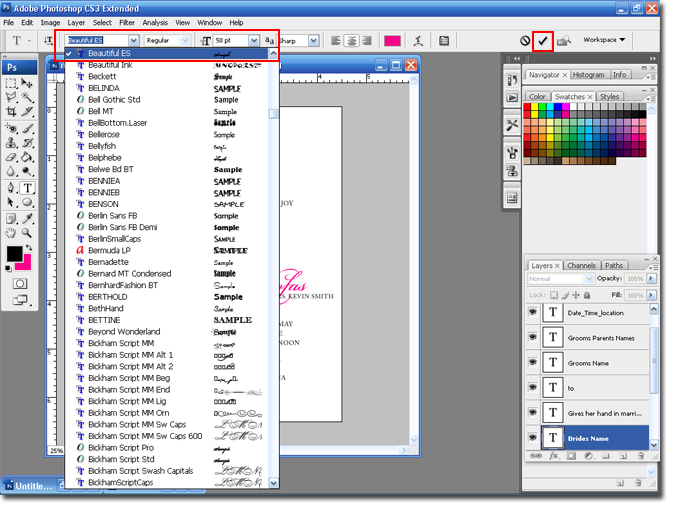
Step 6 Since you changed the text, you may need to move it around some. Select the Move tool to re-center your text.

You are done!


In the next blog entry I will go over sizing and creation of the inserts for the pocktfolder. Including; Directions card, Accommodations card, RSVP card and Reception card. Also, I will be going over how to order the supplies to make everything and the prices.

Hugs,
BriannaNichole!

Wednesday, February 27, 2008

Upcoming Blog Tutorial

Hi, and Happy Wednesday! I hope everyone is having a great week. I wanted to post a little teaser for my next blog entry. The next entry will be all about how to 'Get This Look'. I will post a wedding invitation and everything you need to do to create that look. I will even post my invitation for you to download and to customize with your colors, names, dates etc. I'll even tell you where you can buy the supplies and where you can get them printed.

Here is the look that I am going for.


Stay tuned,
Brianna!

Friday, February 22, 2008

Photoshop Tutorial: Cappy

If you are like me you like to use all caps for wedding paper projects (monograms, table numbers,invitations etc). I get tired of using the Caps Lock button, and if I want to use caps but have the first letter bigger I have to start messing with the size of the fonts. All in all it gets pretty tiresome. Well, in most programs you can set small caps or all caps. In this blog
I am going to show you how to create a simple monogram in all caps without using the Caps Lock key.
Here is the look that I am going for:


Step 1 Open Photoshop, create a new canvas and select the Type Tool.


Pick a font that is not already all caps. In this case I am using Bookman Old Style which is built into most versions of Windows.

Step 2 Type in you and your FH (future hubby's) names. Make sure to put one or two spaces between the names so we can add an ampersand (&) sign later.


Step 3 Highlight the text and select the Character and Paragraph Palette.


Step 4 Select the Character tab.
For Small Caps: Select the button with the Big and Little T's.


For All Caps: Select the button with two Big T's.


Step 5 Add a new layer, select a script font and type an ampersand sign.


Step 6 You may need to increase the size of the ampersand. Once you are happy with the look use the move tool to place it between the names.


Step 7 Highlight the & Layer and move it below the names layer.
Lower the opacity of the & Layer, until you are satified with the results.


Step 8 Use the same script font and type out the wedding date. Use the Crop Tool to trim the canvus.


You are finished!


If you want to change the colors, simply highlight the text and select a new color.

I hope you enjoyed this tutorial,
BriannaNichole!

Wednesday, February 20, 2008

Tropical Dingbats

Most people trying to design wedding monograms, invitations, table numbers etc are not graphic designers. You may not have expensive programs (or knowledge) to create the designs you want. You can use clipart or you can page for images from stock web sites. Or you could download a dingbat. A Dingbat is a term for a font that is an image. It is used just like a font. In fact, I use a lot of dingbats for monograms and other wedding stationary.

I get a lot of requests for Tropical, Nautical or Beach themed stuff. I thought I would share of the free dingbats that I use.

WM Trees
These are all kinds of trees. I mainly use them for the palm tree images, however you can use them for the other tree designs.


Tropicana BV
All kinds of casual tropical images. I like to use three of the letters together to create a really pretty flower.


WM Aquatic
Mostly shells and fish.


SC Down by the Sea
Lots of fish, shells, some starfish and even a few boats.


Ocean Lacy
Fish, shells and beach critters.


KR Down by the Sea
Lots of shells and some beach scenes.


GE Out to Sea
Lots of sea life.


GE Nautica
Lots of ocean scenery; boats, ropes, dingy etc.


Check out some of the monograms that you can make with these dingbats:


As always, I hope you found this tutorial helpful!
BriannaNichole!

Monday, February 18, 2008

Template and Helpful Bios

Hello and welcome to my second blog for the day :) I wanted to share some helpful templates, bios and web sites. I came across most of these while planning my wedding. Hopefully they will prove to be helpful to you to.
------------------------------------------------------------------------------------
How to add Designs and Images to Monograms or Wedding stationary:

Dingbats are a font that is an image. These are really great for your invitations, programs, monograms, table numbers etc. If you are looking for an interesting design you may want to search for a Flourish dingbat. You can Google dingbats and get some really good free web sites.
Here are some I found:
- http://www.dingbatdepot.com/
- http://simplythebest.net/fonts/dingbats.html
- http://www.houseoflime.com/

You can also use clipart in lieu of a dingbat. There are lots of places to get them, but most of the good sites make you pay. One of my favorite free sites is Microsoft's Clip Art page. Microsoft is great if you are using Power Point or Word because you can import your image right in. If you are looking for something and don't mind paying you should check out http://www.istockphoto.com/index.php. They have a lot of really great designs.

There are, also, a bunch of amazing and FREE photoshop brushes out there. The downside to this is that you will need to have photoshop to be able to use the brushes. Although, they may have them for other Adobe products, like Elements. Please take a look at my blog entry on Photoshop Brushes.

-------------------------------------------------------------------------------------

DIY Templates:
Looking for the perfect template for your ceremony program or RSVP card. Look no further. Here is a list of web sites that have all kinds of wedding related stationary templates.
- http://www.gartnerstudios.com: Program Template, Favor Tags and Wording Ideas.
- http://www.finger-foods.com/wedding/#download
- Water Bottle label template.
- http://www.geocities.com/ChicagoRuby821/: Includes; Icons for the big day time line (not the template), fonts, 2 types of programs and chair seating cards.
- http://hawaiianwedding05.bravehost.com/heathers_program.html: CD Favor Templates
- Fan Program Template in Word.
- Time line Template in Word.

-------------------------------------------------------------------------------------

Knot Bio Lists:
- Uncommon Bliss
- Knot Bio Vault
- Specialty Bios
- Beautiful Bios

Helpful Bios
- Readings and Poems Bio: NOTE: This bio looks like nothing, but if you highlight it you will see the text.
- Sand Ceremony Bio

Hopefully this was able to help you a bit. Please stay tuned to my next blog entry, it will be on 'How to Get This Look'. I will post an invitation and tell you; 1. How to Create it, 2. Where you can Purchase the Cardstock and 3. How to put it all together. It will be everything you need to create that very invitation. You will also be able to download my design and the fonts I used to create it.

Hugs,
BriannaNichole!

Friday, February 15, 2008

Knottie Help I

If you are planning a wedding, and have not visited The Knot then you are crazy. The Knot is your one stop shop for all things wedding. They have all kinda of great ideas there for everything having to do with weddings. They even have boards where you can talk to brides and former brides. In fact the boards are my favorite. I found most of my ideas there. I would highly recommend checking it out.

Since I found so much help there, I though I would give a little back. This blog entry is going to be for all those knotties who need some help with the forum boards. You will find information about; all kinds of bio help, how to add pictures/links to your signature, how to post a picture into a post and more.


Bio Help:
YAY for bios. Who doesn't love taking a look at other knotties bios to see all the great ideas they have collected? There are lots of new and easy ways to create your bio. Which one you will use can depend on your skill level with HTML.

Bio Creators
- BriannaNichole's Free html bio template. You can download my bio template for free. You will need to have some knowledge of HTML to use it.
- Google Pages. Lots of knotties are using this. It is a really easy and FREE way to create your bio.
- The Bio Builder The free version is very limited, but the pro version has lots of features.
- STL WedBio Builder Another bio creator/editor.


Picture In Post:
Just use this code and a picture will appear in your post.
1. Upload your image, I like flickr.com or photobucket.
2. Right click the image to get the URL.
3. Go to TinyUrl.com and make the url tiny
4. Enter this code into your post: [img]Tinyurlhere[/img] make sure your tiny url is not bold.


Siggy Help
A signature, or siggy, is what appears at the end of your posts. You can customize it with links, text and pictures.

Add a Link: <*a href="URL Goes Here" target =_"blank">Name of Link<*/a>
- The a href sends you to your link
- The URL is where you want the person to go, i.e your bio etc.
- The Target="blank" makes it open in a new window
- Name of link can be changed to anything you want it to say
- Make sure to add the <*/a> at the end to close the tag
- Take out the *

Here is what it looks like when I link to my bio: My Knot Bio

Add a Picture: <*img src="Picture URL Here" width="250">
- Make sure to remove the *
- The Img src is the image source
- The width is the amount of pixels the picture will be. for the knot I like to set it around 200 - 250.

Here is what it looks like:


Please come back to check out my next blog entry. It will contain links to helpful templates and helpful bios.

I hope you found this blog helpful.
BriannaNichole

Friday, February 8, 2008

Table Number Ideas and Whatnot.

Happy Friday all! Today I wanted to talk about table numbers. For those of you not familiar; table numbers/names identify tables at a wedding reception or event. Table numbers/names are generally used when you have assigned seating. However, if you decide not to assign seating you can still use table numbers/names to add personality to your wedding.

Here are some ideas for table numbers/names.
- Numbers: Simple but effective. By using numbers on the tables you make it easy for your guests and yourself. A nice play on this would be to type the name of the number out, possibly in a different language.
Example: Uno - Spanish for 1.


- Places You Have Visited: This is great if you and your future hubby like to travel. You could even add a picture of you at the location.
Example: Hawaii (at the bottom you could even have a description of the location you went, or the dates and times or why it is special to you.


- I Love You or Love in Different Languages: This has to be one of my favorite ideas. I found a bunch of websites with plenty of info. I Love You List. Documents and Designs have some examples of this.
Examples:
Chinese : Wo ie ni (Manderin, Cantonese)
Danish : Jeg elsker dig
Dutch : Ik hou van jou
ersian (Farsi) : Tora dust midaram
Flemish : Ik zie oe geerne
Finnish : Mina" rakastan sinua
French : Je t'aime
Gaelic : Ta gra agam ort
German : Ich liebe Dich or I mog Di ganz arg! (Suebian: South German dialekt.)
Greek : S' ayapo
Hebrew : aNEE oHEIVET oTKHA (female to male) aNEE oHEIV otAKH (male to female)
Ani ohev at (man to woman) Ani ohevet atah (woman to man)
Hindi: Mein Tumse Pyar Karta Hoon
Hopi : Nu' umi unangwa'ta
Italian : Ti amo
Irish : taim i' ngra leat
Japanese : Kimi o ai shiteru
Korean : Tangsinul sarang ha yo
Latin : Te amo Vos amo
Mohawk : Konoronhkwa
Navajo : Ayor anosh'ni
Norwegian : Jeg elsker deg (Bokmaal)
Pakistani : Muje se mu habbat hai
Persian : Tora dost daram
Pilipino : Mahal Kita Iniibig Kita
Polish : Ja Cie Kocham or Kocham Cie (Pronounced Yacha kocham)
Portuguese : Eu te amo
Romanian : Te iu besc
Russian : Ya lyublyu tebya Ya vas lyublyu
Scot Gaelic : Tha gra\dh agam ort
Shona : Ndinokuda
Sioux : Techihhila
Slovak : lubim ta
Spanish : Te amo
Swedish : Jag a"lskar dig
Swiss-German : Ch'ha di ga"rn


- Fruits of The Spirit: I love this one. Its really perfect for a religious wedding. You can do it a myriad of ways. You can put the attribute on the top (i.e. Love etc) then have the full verse of the fruits of the spirit at the bottom, or just the part that talks about that attribute. Plus the verse.
The Fruits of the Spirit:
Love - "And so we know and rely on the love God has for us. God is love. Whoever lives in love lives in God, and God in him" (1 John 4:16). Through Jesus Christ, our greatest goal is to do all things in love. "Love is patient, love is kind. It does not envy, it does not boast, it is not proud. It is not rude, it is not self-seeking, it is not easily angered, it keeps no record of wrongs. Love does not delight in evil but rejoices with the truth. It always protects, always trusts, always hopes, always perseveres. Love never fails" (1 Corinthians 13:4-8).

Joy - "The joy of the Lord is your strength" (Nehemiah 8:10). "Let us fix our eyes on Jesus, the author and perfecter of our faith, who for the joy set before him endured the cross, scorning its shame, and sat down at the right hand of the throne of God" (Hebrews 12:2).

Peace - "Therefore, since we have been justified through faith, we have peace with God through our Lord Jesus Christ" (Romans 5:1). "May the God of hope fill you with all joy and peace as you trust in him, so that you may overflow with hope by the power of the Holy Spirit" (Romans 15:13).

Longsuffering (patience) -- We are "strengthened with all might, according to his glorious power, unto all patience and longsuffering with joyfulness" (Colossians 1:11). "With all lowliness and meekness, with longsuffering, forbearing one another in love" (Ephesians 4:2).

Gentleness (kindness) -- We should live "in purity, understanding, patience and kindness; in the Holy Spirit and in sincere love; in truthful speech and in the power of God; with weapons of righteousness in the right hand and in the left" (2 Corinthians 6:6-7).

Goodness - "Wherefore also we pray always for you, that our God would count you worthy of this calling, and fulfill all the good pleasure of his goodness, and the work of faith with power" (2 Thessalonians 1:11). "For the fruit of the Spirit is in all goodness and righteousness and truth" (Ephesians 5:9).

Faith (faithfulness) - "O Lord, thou art my God; I will exalt thee, I will praise thy name; for thou hast done wonderful things; thy counsels of old are faithfulness and truth" (Isaiah 25:1). "I pray that out of his glorious riches he may strengthen you with power through his Spirit in your inner being, so that Christ may dwell in your hearts through faith" (Ephesians 3:16-17).

Meekness - "Brethren, if a man be overtaken in a fault, ye which are spiritual, restore such an one in the spirit of meekness; considering thyself, lest thou also be tempted" (Galatians 6:1). "With all lowliness and meekness, with longsuffering, forbearing one another in love" (Ephesians 4:2).

Temperance (self-control) - "But also for this very reason, giving all diligence, add to your faith virtue, to virtue knowledge, to knowledge self-control, to self-control perseverance, to perseverance godliness, to godliness brotherly kindness, and to brotherly kindness love" (2 Peter 1:5-7).


- Wine Grapes/Vineyards: Do you and your future hubby love wine, wine tasting, or getting married at a vineyard? Why not name your tables after different Wine Grapes, Wine Manufacturers or Vineyards?
Examples: Chardonnay, Riesling, Cabernet or Champagne.


- Disneyland: Do you love Disneyland, did you get engaged there? You could name your tables after rides or lands at Disneyland. You could even add pictures of you an FH at Disneyland to them.
Examples: Tomorrow Land, Fantasy Land etc.


- Famous Couples: If you are a romantic you might want to name your tables after famous couples.
Examples:Romeo & Juliet, Anthony & Cleopatra, Fred & Ginger or Micky & Minnie.


- Fav. TV Shows/Films: If you and your FH are film or TV buffs you might want to name your tables after some of your fav. TV Shows or Films. You could do this with love songs too.
Examples: Dirty Dancing, Casablanca etc.


- Beaches: If you are having a destination wedding, getting married at/overlooking the beach or you just love the ocean you can name your tables after beaches, shells, oceans etc..
Example: Hermosa Beach.


- Qualities and Sentiments: Inseparable - Happiness - Laughter - Cherish - Love - Fun - Friendship - Adore - Passion - Bliss - Devotion - Affection - Faith
Honesty - Hope - Loyalty - Kindness - Admire - Patience - Respect
Trust - Commitment - Eternal - Eternity - Sharing - Sincerity
Support - Peace - Forever - Forgiveness - Sacrifice - Dreams
Communication - Vows -Caring - Understanding - Expectations
Family - Promise - Life- Everlasting - Romance


Here are some examples of Table Numbers/Names I created. Stay tuned for free downloads and directions on how to edit these table numbers.


Thanks so much for checking out my blog. I hope this was helpful.

Hugs,
BriannaNichole.

Sunday, February 3, 2008

Brushes are My New Friend!

Oh Photoshop Brushes, how do I love thee? Let me count the ways; flowers, flourishes, animals............

I am so very excited to have discovered photoshop brushes. Lots of very nice people have gone through all the trouble to create free brushes for non-commercial use. Photoshop brushes allow you to add just about anything to a canvas. So if you are looking for a flourish, heart, flower, border etc try searching the Internet for a brush.

How do find a Photoshop Brush? You can find Photoshop brushes all over the internet. Just go to Google and search PhotoShop Brushes and you will be amazed at how many sites there are.

How Do I Install The Brushes?
1. Download the Brush and Unzip the file (if needed)
2. Put the file in the Brushes Folder: My Computer > C Drive > Program Files > Adobe > Adobe Photoshop X (x is the version of photoshop you have, in my case its CS 2) > Presets > Brushes
C:\Program Files\Adobe\Adobe Photoshop CS2\Presets\Brushes
3. Reboot your Computer and you are ready to go!

How Do I Use My New Brushes?
1. Open Photoshop
2. Select the Paintbrush Tool
3. Click on the down arrow next to the paintbrush type
4. Click on the right facing arrow, next to the paintbrush size
5. Select the brush you want and click ok.

The only problem I have found with using the new brushes is that you are limited to the size of the brush. Making it smaller is fine, but when you make it bigger it damages the quality. I have not found a way around this yet.

The brushes can be used for pretty much anything. The only limit is your imagination. I had so much fun playing with my new brushes. Check out a few of the designs I came up with.


Hope you enjoyed this tutorial,
BriannaNichole!

Friday, February 1, 2008

Power Point Monogram Tutorial

So, I tried to sit down and create a tutorial on how to create monograms in Power Point. I thought it might be helpful for all those girls who do not have a copy of photoshop. Turns out there is already a really great video tutorial on how to do this. I'm not usually a fan of video tutorials, but this one is really easy to follow. Power Point Monogram Tutorial.

Hope you all find it helpful!
BriannaNichole!