Note: You must have Photoshop to be able to edit and use this Invitation. I will try and come up with the design for Microsoft Word or PowerPoint, but right now it can only be used with Photoshop.
Download Invitation File
The Invitation, Reception, RSVP, Direction and Accommodation cards are all the correct sizes to be used in the Signature Pocketfold from Cards and Pockets.com.
Fonts used:
Medieval Motif II: This is the dingbat for the flourish at the top of the invitation.
Bickham fancy script: Used with Beautiful ES Script as the scrip font. This font is not free, but you can use the Beautiful Caps Script and Beautiful ES Script to create the same look.
Beautiful Caps ES
Beautiful ES
Carlos: Font used for the block letters. This font can be replaced with any block font you like.
**Note: All fonts are for PC only. Sorry Mac guys :(
Sizing - The Signature pocketfold (from cardsandpockets.com) is 5x7. The Invitation is designed to be 4.5 x 6.5 or 4.75 x 6.75, the size will depend on if you plan on having a mat behind your invitation.
**The invitation mat is a colored piece of cardstock that sits between the invitation and the pocketfolder. It is slightly smaller than the pocketfolder and slightly bigger than the invitation. Thus giving you the mat look (like on a picture in a frame)
If you have an invitation mat then the invitation will be 4.5 x 6.5, if you opt not to have one the invitation will be 4.75 x 6.5. Generally the invitation mat will be 4.75 x 6.75. You can purchase the mat already pre-cut from Cardsandpockets.com.
My invitation is created to be 4.5 x 6.5. If you wish your invitation to be bigger; simply increase the canvas size by .25 inches.
The Invitation:

Step Download the fonts and the .psd file. You will need to place the fonts in your fonts folder: My Computer > C Drive > Windows Folder > Fonts Folder.
You will need to reboot your computer before you can use your new fonts.
Step Open the invitation.psd file in Photoshop.

Each layer is labeled so it should be easy to see what layer you need to edit.
Step 2 Click on the Color Pallet tool to select the colors that you want the invitation to be. In this case I am going to use black and hot pink.


We are going to change all the color first and then customize it with your personal information.
Step 3 Select the layer you want to edit, select the Text Tool and highlight your text. Click on the arrow next to the Color Pallet tool to switch the colors. Keep switching them until the color you want is set to the foreground (i.e. The first color box).

Do this with all the layers until your invitation is the colors you desire.
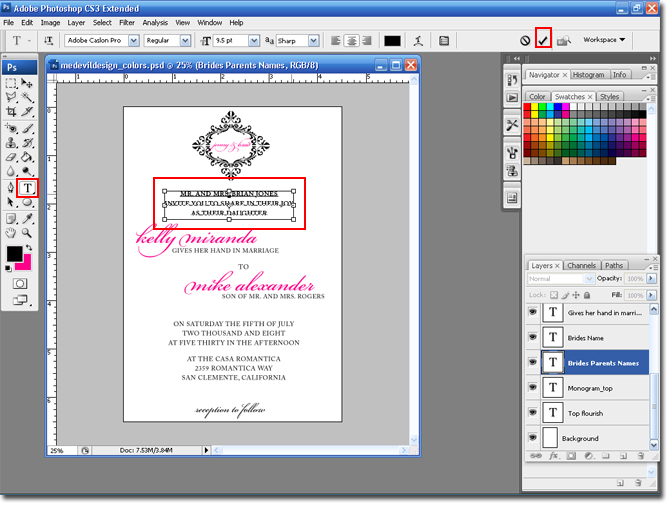
Step 4 Select the Type tool and the layer with which you want to edit the type. Highlight the text you wish to change, and type in the new text.

Continue doing this until the invitation has been personalized with all your information.
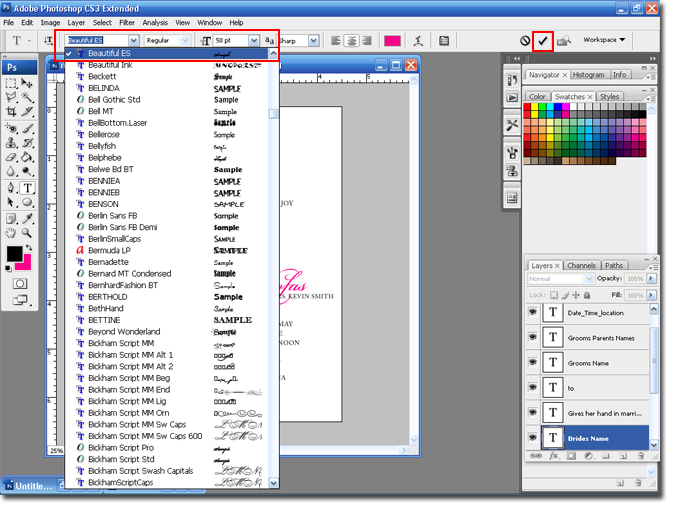
The next step is optional. If you notice the Bickham Fancy Script can be hard to read some letters. If you wish you can select certain letters and substitute the font with the Beautiful Script.

Step 5 Select the Type tool and highlight the letters you wish to edit. Click on the down arrow to change the font. When you are finished click on the Arrow.

Step 6 Since you changed the text, you may need to move it around some. Select the Move tool to re-center your text.
You are done!

In the next blog entry I will go over sizing and creation of the inserts for the pocktfolder. Including; Directions card, Accommodations card, RSVP card and Reception card. Also, I will be going over how to order the supplies to make everything and the prices.
Hugs,
BriannaNichole!

3 comments:
Hey BriannaNichole, have you created the RSVP, accommodations and reception cards yet for this invitation? I would be interested to see how you size and title them.
I have not.
Hello! This site is so awesome!! I was wondering if you have the RSVP, Accomodations and reception cards yet? I would love to see them... I would totally appreciate it.. I have no experience with photoshop so It is very confusing! Thanks in advance!
Post a Comment