Hi and welcome to my blog. WeddingMonograms.blogspot.com was created to help DIY brides learn how to create Monograms and other wedding designs in photoshop. I hope that you find this blog helpful. Please feel free to email me with any questions or suggestions for tutorials at WeddingMonograms@gmail.com
Congratulations and Happy Planning,
BriannaNichole!


Saturday, November 24, 2012

First Batch Of Free Wedding Monograms Are Ready

Hi Hi Everyone! Hope all of you in the US enjoyed your Thanksgiving holiday. I for one ate way to much on both Thursday and Friday. Guess my diet will just have to start on Monday.

OK enough of diet talk, let's get down to the good stuff. Here is the first batch of monograms. There are more to come and I am even open to doing a few more free ones. Don't hesitate to contact me.

Aimee & Jesse


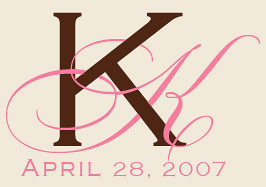
Katheryn & Nathan


Bianca & Rafael


If you are interested in a free monogram email me here: weddingmonograms@gmail.com I will create one monogram for you of my choosing based on the info that you provide me with. Since they are free I will not make any edits unless due to a mistake. Feel free to email me with questions.

I'll need the following information:
  • Names - Bride & grooms name. Include his last name and tell me if you want it on the monogram.
  • Wedding Date
  • Colors - Pick one to four colors from this site:http://www.computerhope.com/htmcolor.htm
  • Wedding type - Casual, contemporary, classic/romantic, symbolic (palm tree, damask, ornate).
  • Anything else you think I might need to know (designs you like, wedding location, where you may use it etc).


Monday, November 19, 2012

Free Wedding Monograms

Ok Guys, who is up for free wedding monograms? I thought it might be a great way to start off the Thanksgiving week by offering free monograms. I will create one monogram for you of my choosing based on the info that you provide me with. Since they are free I will not make any edits unless due to a mistake. Feel free to email me with questions.

How do you get it? Just email me at: weddingmonograms@gmail.com with the following information:
  • Names - Bride & grooms name. Include his last name and tell me if you want it on the monogram.
  • Wedding Date
  • Colors - Pick one to four colors from this site:http://www.computerhope.com/htmcolor.htm
  • Wedding type - Casual, contemporary, classic/romantic, symbolic (palm tree, damask, ornate).
  • Anything else you think I might need to know (designs you like, wedding location, where you may use it etc).


Twined Initial Monogram Tutorial

This is by far my favorite type of monogram. There are so many ways to do it depending on the type of font you use and your initials. The twine monogram, as I like to call it, is two initials that wrap around one another. You get the 'wrap around' effect by erasing part of one letter. This tutorial can be used in most of the latter versions of Photoshop, including CS versions.

Here is my final product:


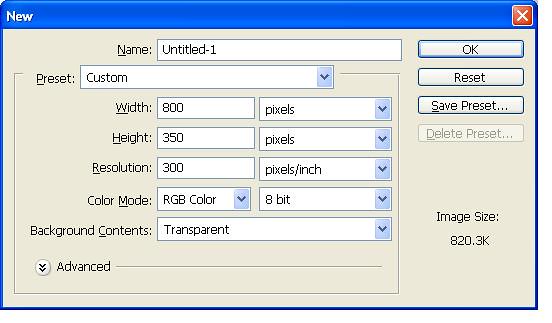
Step 1 Start by opening photoshop. Create a new canvas by hitting Ctrl + N on your keyboard, or going to File > New. I like to make the canvas big, here are my settings:


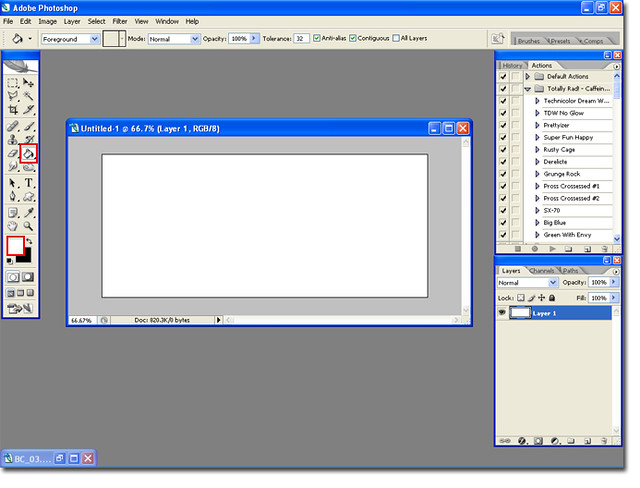
Step 2 Highlight the background layer, and then use the paint bucket tool to fill the layer with white.


Tip: I find it best to use two to three colors for the Twine Monogram. The initials need to be different colors so you get the effect of the letters wrapping around one another.

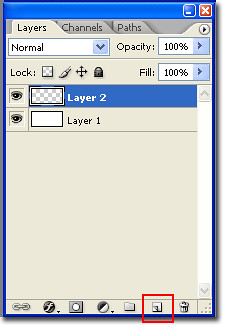
Step 3 Create a new layer using the New Layer icon.


Step 4 Select two fonts; one cursive and one block. If you need some help with finding fonts visit my font bio. I am going to use Sloop-ScriptTwo and Rutaban as my fonts.

Note Not all fonts work with all initials. You may find that you love how a B looks like in Arial, but you may hate it for a D. The best way is to play around with fonts until you get ones that you like for your initials.

Step 5 Select Layer 2, the top layer, and select the type tool.


Step 6 Type in your first letter. Create a new layer, by using the New Layer Icon. Type in your second letter on the new layer. Use move tool to place the second letter on top of the first letter.


Step 7 Right click each layer with the letters and select Rastersize Type. This will make the layer an image and allow us to erase a section.


Tip: Make sure you are not right clicking on the thumbnail of the layer or you will not get the Rastersize option.

Step 8 Ctrl + Click On the thumbnail of the layer second from the top and highlight the top layer. You will see the marching ants on the bottom letter.


Tip: To make the image appear bigger Ctrl + + sign. This will make it easier to see what needs to be erased.

Step 9 Select the Eraser tool and begin erasing sections of the top layer. I like to eraser every other section to see what looks best. If you do not like what you did you can 'step back' by hitting Ctrl + Alt + Z.


When you are finished hit Ctrl + D, to deselect the bottom letter. You are finished! Try to be create and add names, your wedding date or even your wedding location.

Here is my finished product, and some other examples of this type of monogram:


Hopefully you found this tutorial helpful. :)

BriannaNichole!

Sunday, November 18, 2012

Wedding Monogram Tutorial: Separates Font

Happy almost Thanksgiving everyone! In celebration of Breaking Dawn I thought we might do another monogram tutorial today. While my monogram really has nothing to do with Twilight I thought the names would be a nice little nod to the ending of the franchise.

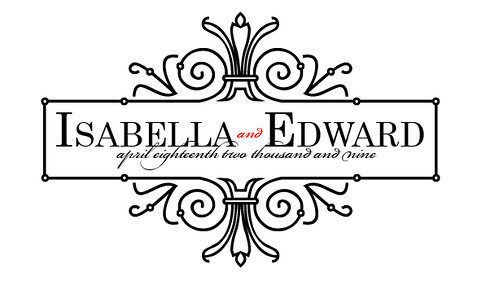
Today's monogram is perfect for lots of wedding stationary. This design is made with a dingbat font called Separates. Here is the look that we are going for:
sepmonogram copy copy

Step 1: Download and install the Separate font. You can get it Here. If you need help installing the font, check out my step by step tutorial Here.

Step 2: Open Photoshop and create a new canvas. Feel free to play around with the size of your canvas. Here are the settings I used.
01

Step 3: Select the Paintbucket tool, set the foreground color to white and click once on your canvas.
02
Note: You can always use a different background depending on the color of your stationary.

Step 4: In the layers pallet select the Add Layer button.
03

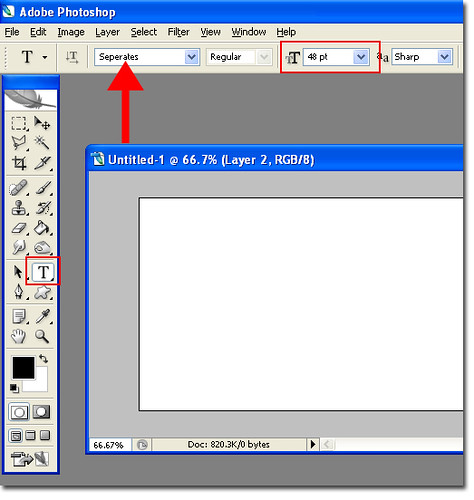
Step 5: Select the Type tool and set the font to Separates . I set the font size to 48, but you may need to change this depending on the size canvas you used.
04

Step 6: Type an S with the Seperates. Select the Move tool and move the image to the top middle of the canvas.
05

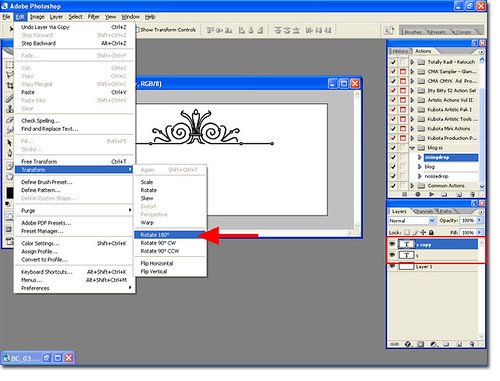
Step 7: Hit Ctrl + J to duplicate the S (design) layer. Go to Edit > Transform > Roatate 180.
06

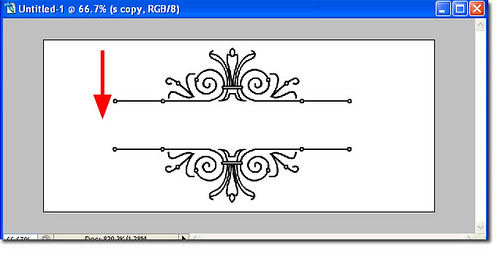
Step 9: Use the down arrow on your keyboard to move the upside down design.
07

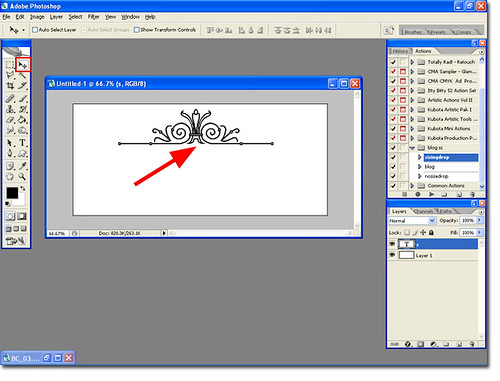
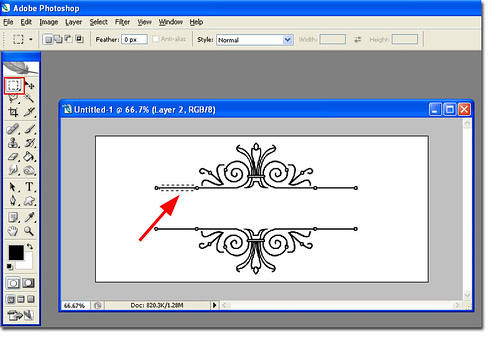
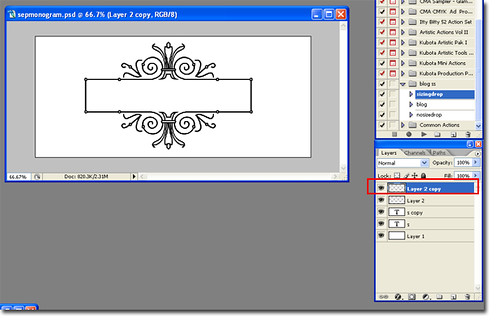
Step 10: In the layers pallet select the first S layer. Using the Rectangle Marquee tool; select the space shown in the screen shot below. This will be used to close our monogram.
08

Step 11: Hit Ctrl + C to select the design. In the layers pallet select the Add Layer button. With the new layer selected Hit Ctrl + V to paste the selection into the new layer.

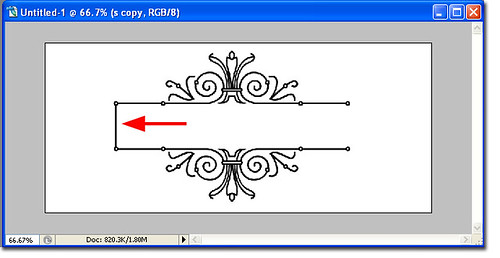
Step 12: Go to Edit > Transform > Rotate 180 to rotate the new layer. Use the Move tool to move the line and close up the one side of the rectangle.
009

Step 13: Hit Ctrl + J to duplicate the layer. Go to Edit > Transform > Roatate 180, and then Use Move tool to move the line and close up the other side of the rectangle.Now your rectangle should be closed like in the screen shot below.
010

Step 14: Create a new layer and select your Text tool to add you and your finance's names and your wedding date. I used Bell for the names and Bicham Fancy Script for the date. You can be create here and really add anything that you like.
sepmonogram copy copy

Hopefully you enjoyed this tutorial. Please let me know if you have any questions or if you you run into problems.


Have a fabulous Thanksgiving,
BriannaNichole!

Wednesday, November 14, 2012

Dingbats For Wedding Monograms

Ok, so you are looking to create a monogram but it's looking a little boring with just your text. You think hey I want to add some sort of design or flourish to spruce it up, but you don't know where to start. Well my friend you have come to the right place.

Earlier today I got an email from one of my former brides, who I created some monograms for. She was looking for some ways to replicate a few monograms I had created in the past. Unfortunately for her the images that I created were doctored by me so there isn't an easy way to create the exact design. However luckily for her, and all you lovely ladies out there, the Internet has so many similar designs that you are sure to find something close to what you want.

The two main ways I recommend adding designs to your monogram, invitation, table numbers, rsvp cards, seating chart, menu etc. is by using either Dingbats or Photoshop Brushes.

I happen to have some how to's on these very topics.

Photoshop Brush How To

Dingbat How To Here

Here are a few examples of dingbat monograms:


Just to help a little more I will be posting a tutorial on how to create last monogram. This should really show you how to work with dingbats.

And Remember you can purchase monograms as well. Monograms are 1 for $5.00. You will be able to select from three versions, or you can purchase all three for $10.00.

How do you get it? Just email me at: weddingmonograms@gmail.com with the following information:
  • Names - Bride & grooms name. Include his last name and tell me if you want it on the monogram.
  • Wedding Date
  • Colors - Pick one to four colors from this site: http://www.computerhope.com/htmcolor.htm
  • Wedding type - Casual, contemporary, classic/romantic, symbolic (palm tree, damask, ornate).
  • Anything else you think I might need to know (designs you like, wedding location, where you may use it etc).


Payment? I use paypal. Once I send you choose the monogram you would like I will send you the invoice. Once payment is made I will send you the high resolution files.

Happy Planning,
Brianna!