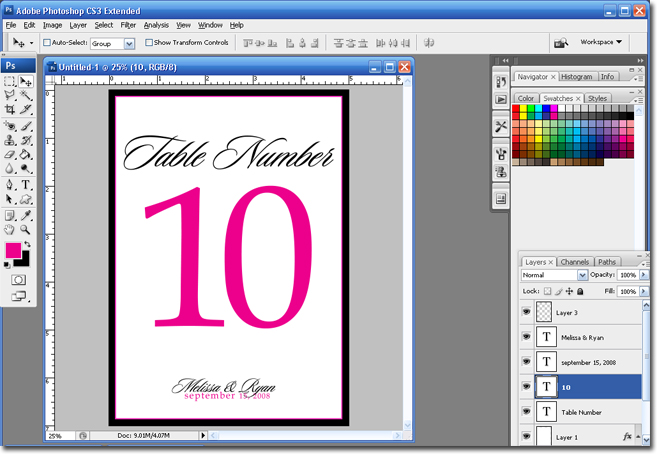
Hi and welcome to my blog. WeddingMonograms.blogspot.com was created to help DIY brides learn how to create Monograms and other wedding designs in photoshop. I hope that you find this blog helpful. Please feel free to email me with any questions or suggestions for tutorials at WeddingMonograms@gmail.com
Congratulations and Happy Planning,
BriannaNichole!


Monday, March 17, 2008

St. Patrick's Day Shamrock Monogram

In honor of St Patty's day I thought it might be nice to do a Shamrock monogram. So here is the look we are going for:


Step 1 Open Photoshop and create a new canvas, Ctrl + N or File > New.
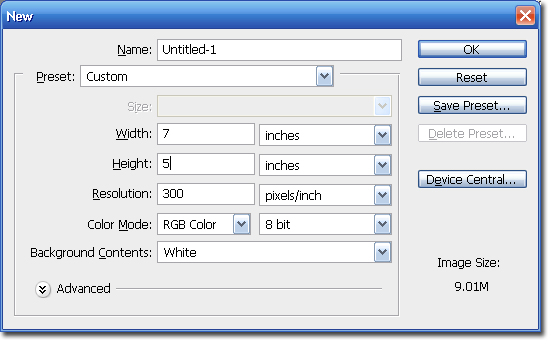

Step 2 Use the Color tool and set the foreground color to green and the background color to black.


Step 3 Select the Custom Shape Tool.


Step 4 Set the shape to the Clover shape.
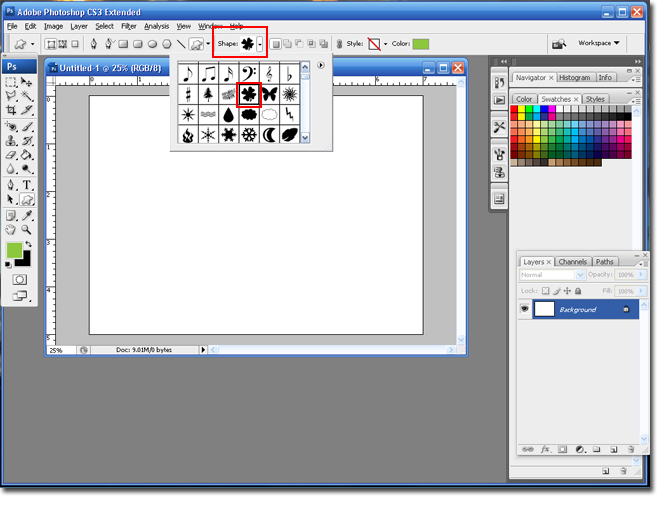

Step 5 Hold down the left-click button on your mouse and drag it to draw your shape. Don't worry if it is not centered because we can center it with the move tool later. The clover will appear in a new layer automatically.


Step 6 Create a new layer and change the foreground color to black.

Step 7 Select the Type Tool and select a script font. I am going to use the Sloop Script font. Type in your names.
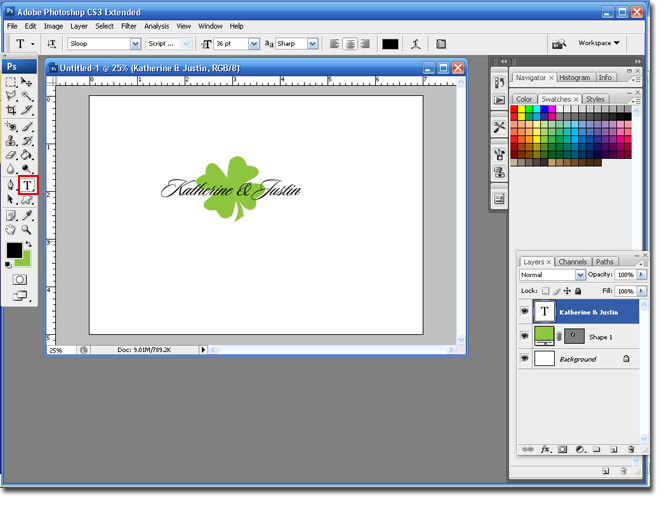

Step 8 Create a new layer, make the text size smaller and type in your wedding date.
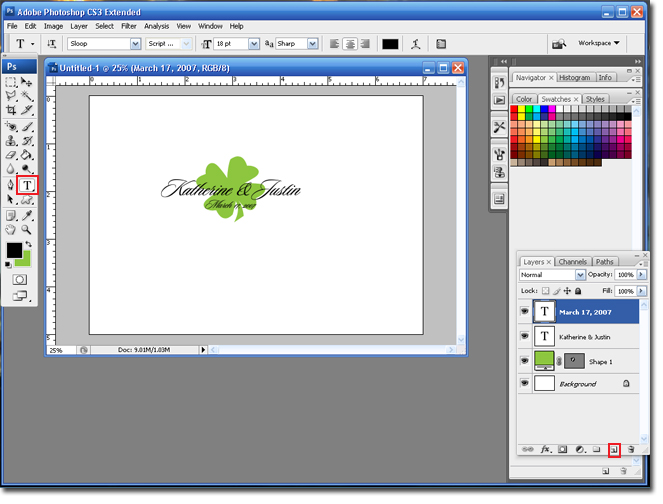

Step 9 Select the Move Tool and move around the layers until you are happy with the results.
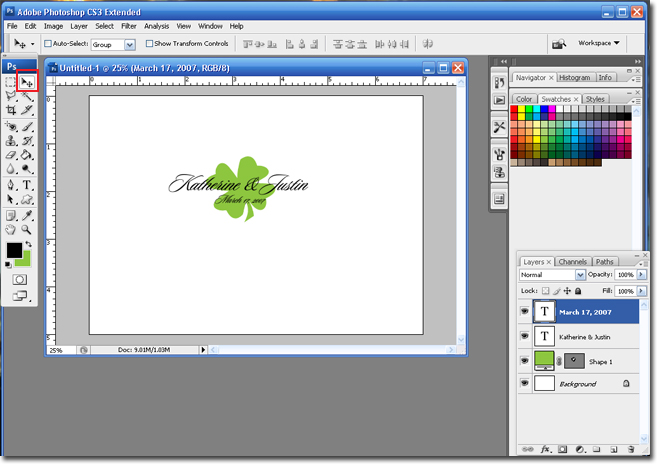

Step 10 Select the Crop Tool and trip the canvas as needed.


You are finished!! If you really want to get fun a creative try downloading some Shamrock Photoshop brushes.

Thursday, March 13, 2008

Letter Behind Monogram Tutorial

I call this monogram the 'Letter Behind' because I really had no idea what else to call it. This monogram consists of the couples names with their last name (or soon to be last name) first initial behind the names. Thus the name 'Letter Behind' monogram.

This monogram can be done in two ways, its just a matter of switching the type of fonts that we use. I'll show you two different ways.

Here is look #1:


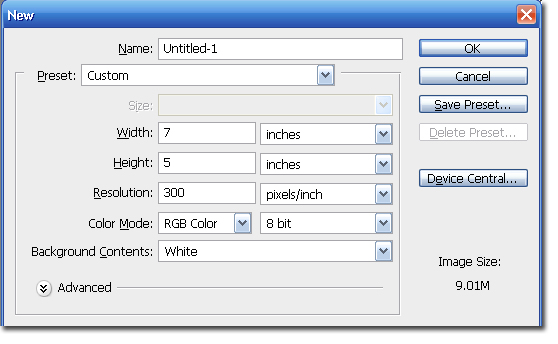
Step 1 Open a new canvas in Photoshop. Mine monogram is going to be Pink and Black.


Step 2 Select the color you want for the names in front. I am going to use black. Select the Type tool. and a good Serif or Block font, nothing that is a script. I am going to use Book Antiqua, which is built into Windows.


Step 3 Type in you and your FIs names. Use the Move tool to center your text.


Step 4 Add a new layer by selecting the Add a New Layer icon.


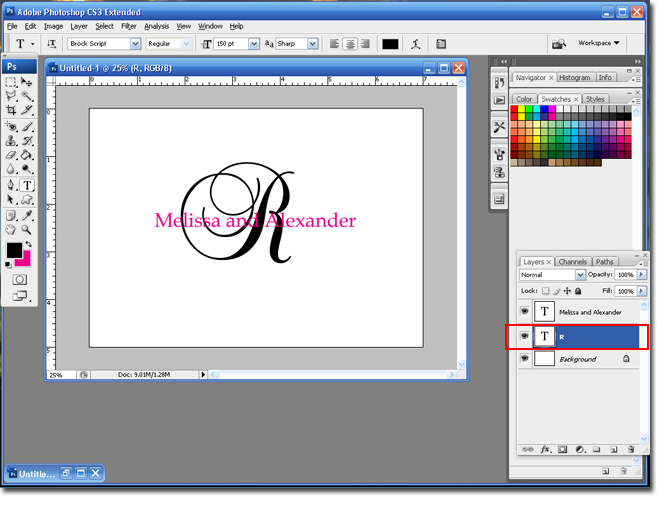
Step 5 Change; the font color, the font size (somewhere around 150) and the font to a script font (I am using the Brock Font). Type in the first initial of your France's last name.


Step 6 If you notice the last name is now in front of the names. If you grab the initial layer and drag it below the names layer it will be behind the names.


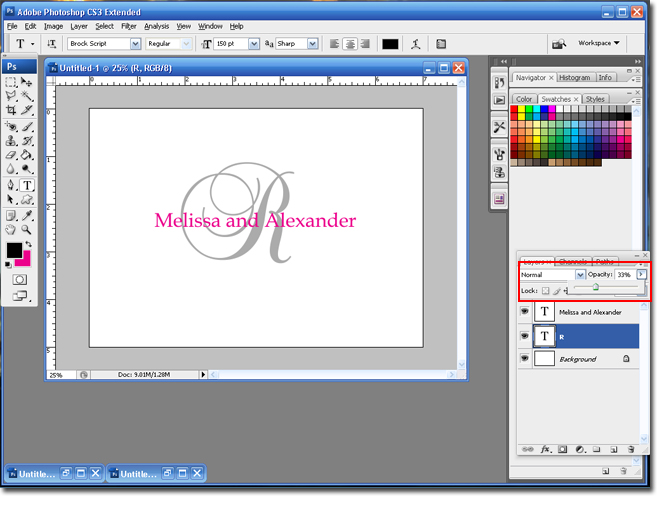
Step 7 Depending on your colors you may not be able to read the names. If your last name initial is too dark you can lower the opacity by using the slider in your Layer Pallet


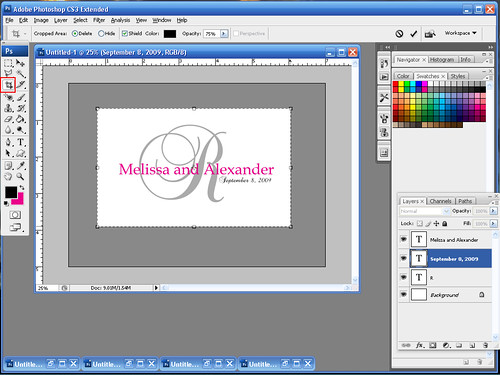
Step 8 Use the same font as the initial to add the date.


Step 9 Use the Crop tool to get rid of the extra canvas.


You are finished

The second way to do this tutorial is to have the names in a script font and the last name initial in a block or serif font. Use the steps I have provided but just switch the font types.


Hope this tutorial was helpful!
BriannaNichole!

What You Need Help With Answers I

Hello and happy Thursday to all! I received a few responses to my What Do You Need Help with in Photoshop blog entry. I wanted to take a minute to answer them.

kwhited asked:
- How she could save a Photoshop file and import it into Word so she could print it at home.

Dear kwhited,
First off I would not put any files into Microsoft Word. When you insert the file it compresses the image and lowers the resolution (quality). If you are just trying to print it from home you can save the Photoshop design as a .tiff. This is like a .jpg but it allows you to save the layers of the file and it doesn't compress the image as much as a .jpg.

When you get home just open the file in the Windows Viewer (built in program in Windows) and print it from there.

This should give you the best results as well as save you the time of putting the file into a word document.


MunleysWifey asked:
- What all the tools were in Photoshop.
- How to make a 10x10 wedding album page so she could upload it. She wanted to be able to cut a picture in 1/2 so one was on the right page and 1/2 was on the left.

Dear MunleysWifey,
You are sure asking for a tall order! Instead of reinventing the wheel I will refer you to a great tutorial for Photoshop beginners: http://www.g3fusion.com/?p=8. This tutorial will walk you through all the basic functions of the Photoshop Tools.

Hopefully I understand what you are looking for with the other request, if not please leave me a comment to let me know. I will show you how to cut a picture in half and save each image as a separate file.

Step 1 Open your photo in Photoshop: From Photoshop you can hit Ctrl + O, then select the location of your image.


Step 2 Turn on the Rulers by hitting Ctrl + R. Or you can go to View . Rulers.


Step 3 Select the square Marquee tool and select 1/2 of the picture.

Step 4 Hit Ctrl + C to select what you drew a selection around.

Step 5 Hit Ctrl + N to open a new canvas. This canvas will automatically be the size you need (it does that when you select ctrl + c). Hit Hit Ctrl + V to paste your image onto the new canvas.


Step 6 Go back to the original image and Inverse, Shift + Ctrl + I or Select > Inverse, the selection. This will select the other half of the image.

Follow steps 4 and 5 for this section and you are finished.
Original Photo


Right Half


Left Half


I hope these tutorials answered some questions and were of help.
Thanks,
BriannaNichole!

Monday, March 10, 2008

Dots in a Circle Monogram

I am so into dots right now. They are perfect for a contemporary monogram design. So, I have decided to do a tutorial to show you how to create a monogram like the logo on my personal blog FabBriannaNichole.blogspot.com. Which, btw, has lots of photoshop tutorials on how to edit pictures.

Here is the look that we are going for:


Step 1 Open Photoshop and create a new Canvas (Ctrl + N or File > New). Use my settings.


Step 2 Click on the Add New Layer icon, to add a new layer.


Step 3 Select the Ellipse Tool and select Paths (the square at the top with a pen in it).


Step 4 Hold down the Shift key and draw a circle. Holding the shift key will constran the proportions. Select the Painbrush tool and set it to hard edged brush about 70 pixels.


Step 5 Hit F5 or go to Window > Brushes to open the bush settings.


Step 6 Highlight Brush Tip Shape. Change the Angle to 0% and Set the Spacing to around 200%.


Step 7 In the Layer Pallet window select the Paths tab. Click on the Open Circle icon at the bottom. Your dots should appear.


Note: The dots in your circle may not be spaced correctly. If so; hit Ctrl + Z. This will undo the last action. Go back to the brush settings (f5) and change the spacing. Keep doing this until your dot spacing is perfect.


Step 8 Select the WorkPath layer and drag it to the trash can. This will get rid of the line between your dots. Select the Layers tab.


Step 9 Select the Ellipse tool, and change the type to Shape Layers, create a new layer and draw a circle smaller than the one you already created. Remember to hold down the Shift button.


I made mine red, feel free to use any color you like.


The rest of the steps are up to you. Use your imagination and make a totally unique monogram, or copy the one I created.

Step 10 Follow the pervious steps to create another circlee of dots in another color. Use the Move tool to move it down a little, like in my monogram.


Just add some text and you are finished.

Hope you enjoyed the monogram tutorial,
Brianna!

What Do You Need Help With in Photoshop?

Is there something in Photoshop that you just don't understand? Are you looking to re-create a specific monogram or design? Is there some step that has just been stumping you? Well, this is your chance to get some help. Leave me a comment with your question or problem and I will create a Photoshop tutorial just for you.

Hope to hear from you,
BriannaNichole!

Thursday, March 6, 2008

So you need some Help Installing Fonts

* Note this tutorial is for those using Windows 2000 and XP. I have heard people are having problems installing in Windows Vista, but I don't have that OS so I cannot try it out.

Step 1 Create a folder where you want to put your fonts. I like to download the fonts to my desktop in a folder called fonts. Right Click your desktop and select New > Folder. Name the folder Fonts.


Step 2 Find the font that you want to download. If you need some help finding font websites you can check out my Font Bio or you can Google 'Free Fonts', or the name of the font you are looking for. Download the font you want and click Save.


Step 3 Select the location of your Fonts folder and click Save.


Step 4 Open the fonts folder you created on the desktop and unzip the file. Select the xxx.ttf file and hit Ctrl + C.


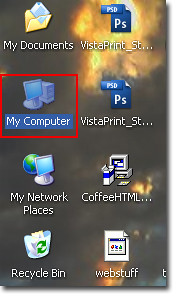
Step 5 Go to the Fonts Folder: My computer > C Drive > WINDOWS folder > Fonts folder.

Double-Click the My Computer icon.


Double-Click on the Local Disk drive, usually the C drive.


Double-Click on the WINDOWS folder.


Double-Click on the Fonts folder.


Step 5 In the Fonts folder, click Ctrl + V. This will paste the font file into the fonts folder. Click on the X in the right hand corner to close the Window.


Step 6 You must re-boot your computer to use your new font.

Your Font should now be installed and ready to use.
BriannaNichole!

Wednesday, March 5, 2008

Create a Border

Borders are a great way to make your design look nice. You will see this a lot in invitations, table numbers and other wedding paper designs. There are a couple of ways that you can add a border to a design; one is to add a piece of colored cardstock that is a bit bigger than the design and the other is to use photoshop to create the band of color. I think that the cardstock option produces better results, but it can be costly and timely to cut all the cardstock. Using Photoshop to create the border is a great alternative.

There are a few ways that you can create the border in PhotoShop, but I will show you the one that works the best for me.

Here is the look that we are going for


You need to figure out how big you want your design to be and you need to figure out how big you want your Border to be. If you are not sure what sizes, you may just need to play around with it a bit until you get the results you like

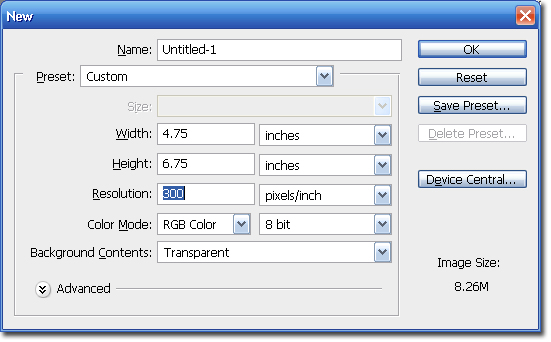
Step 1 Open Photoshop and create a new canvas, you will need to set the canvas size a bit smaller than you want the whole design to be. Basically, when you create the canvas it will be the size of the design minus the size of the border.

Example: My completed design is going to be 5x7, and I want my border to be .25 (1/4 of an inch). So when I create my design I will set the canvas size to 4.75 x 6.75 (.25 less then the final size).


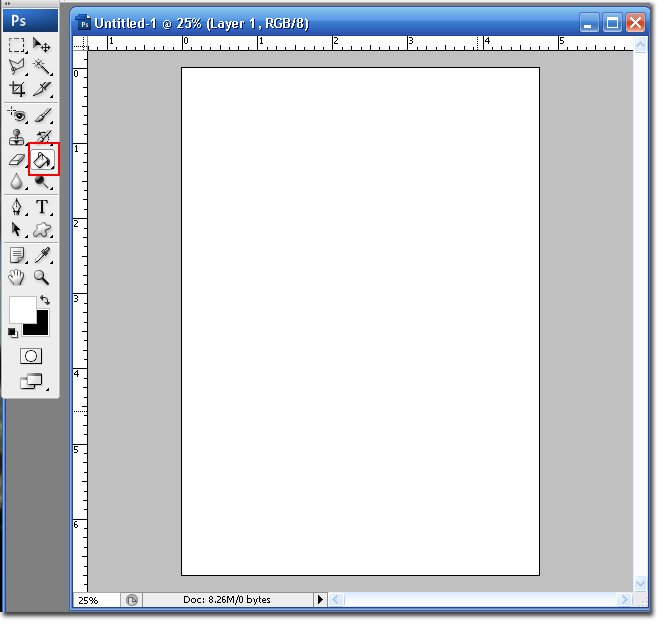
Step 2 Select the Paintbucket tool and click on the canvas to fill it with the color of your design. In this case I am using white for the background.


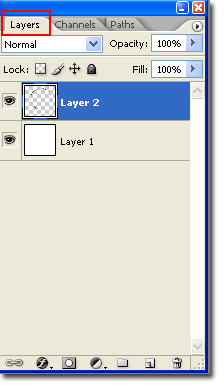
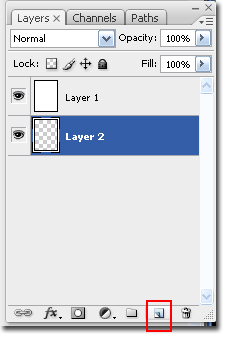
Step 3 Select the New Layer icon to add a new layer. Select the new layer and drag it below the first layer.


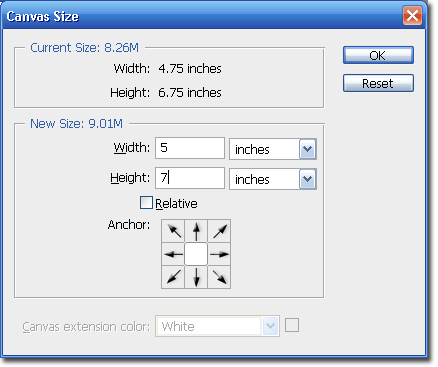
Step 4 Go to Image and Canvas Size or Alt+Ctrl+C.


Step 5 Uncheck the Relative box, and enter in the size you want the completed design to be. In this case I am changing it to 5 Width and 7 Length. Click Ok when you are finished.


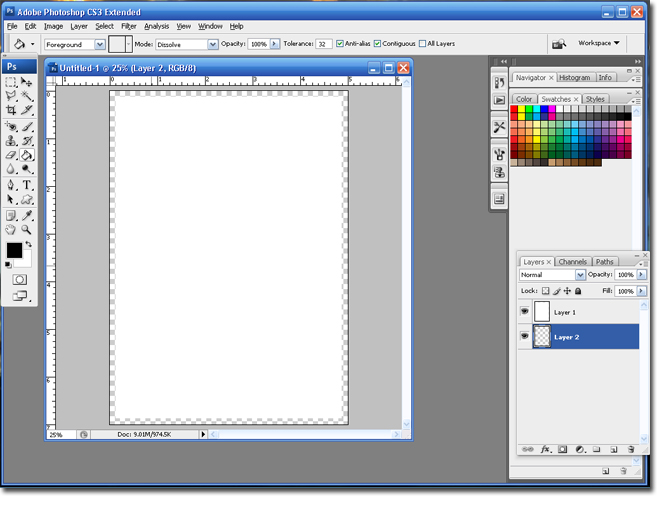
Step 6 With the bottom layer highlighted; Use the Paintbucket tool and click on the canvas once.


At this point you are finished! If you wish to include a second border color you can use the same steps as we already did, or you can add a stroke. Follow the steps below to add a stroke (another border) to your design.

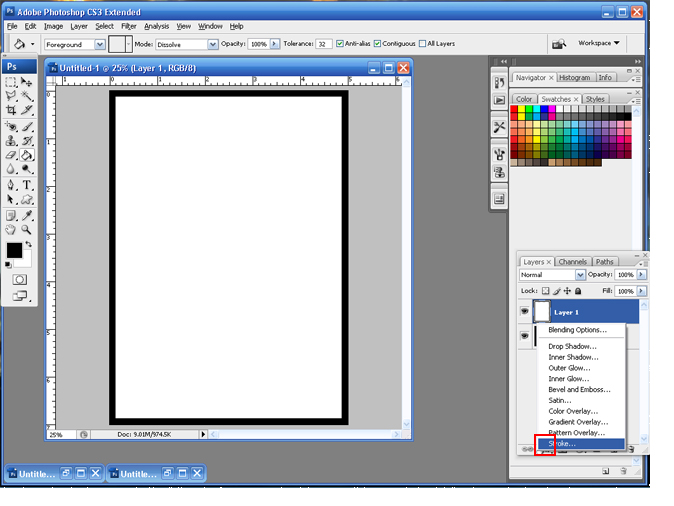
Step 7 Click on the Fx (add layer style) icon and select Stroke


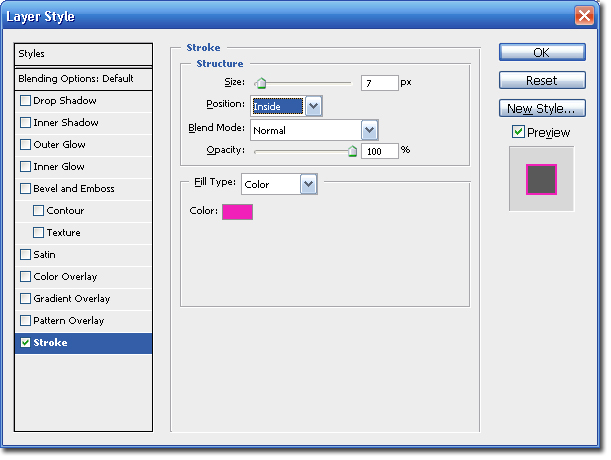
Step 8 Change the Size to the thickness you desire and change the Position to Inside.


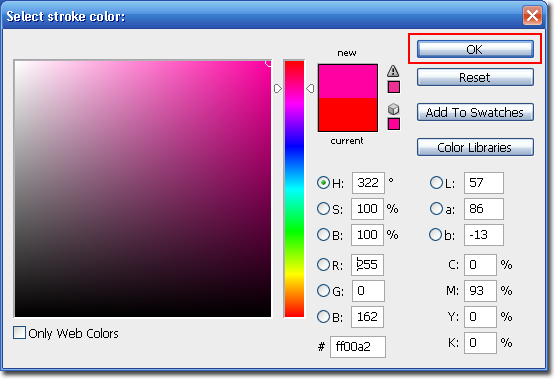
Step 9 Click on the colored square next to Color option. Select your color and click the Ok button.


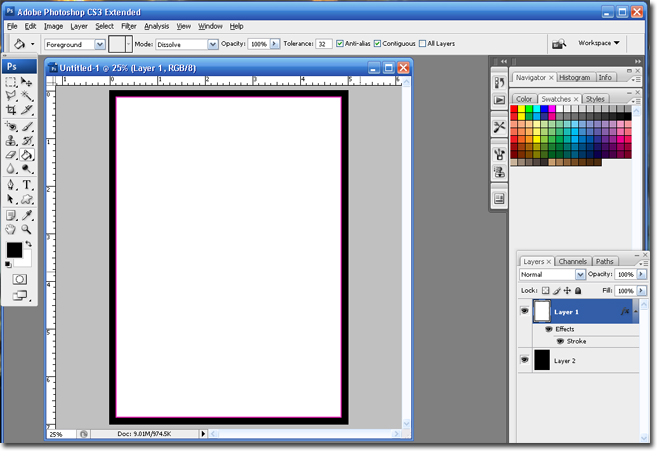
Step 10 Click the Ok button to save the settings. Your canvas will look something like this.


You are finished! I created a table number from my design.


I hope you found this tutorial helpful.

Hugs,
BriannaNichole!