Since I am so nice, I am going to give away some free monograms today. If you email or leave me a comment today (March 31, 2008) I will give you one free monogram.
Here is how we do it:
- You give me: You & Your FI name (his last), your wedding date, wedding colors (be specific), location (if you want included), wedding style (contemporary etc) and any fonts you like.
- I create 4 monograms for you.
- You choose the monogram you like best & I give it to you FOR FREE.
You can decide to buy the other monograms for $5. At that time you can ask for edits to the monogram ( a different font, dingbat, etc).
Happy Wedding Planning!
BriannaNichole.
weddingmonograms@gmail.com

Showing posts with label monogram. Show all posts
Showing posts with label monogram. Show all posts
Monday, March 31, 2008
Tuesday, March 25, 2008
Triple Box Monogram Tutorial
I saw this monogram on an invitation and I fell in love with it. There is really so much that you can do with it. I could see it on an invitation, program, menu or even on an aisle runner.
There are a lot of steps to this tutorial, but don't get discouraged. It may seem like a lot of steps but they are pretty easy and very similar.
Good Luck!
So here is the design that we are going for:

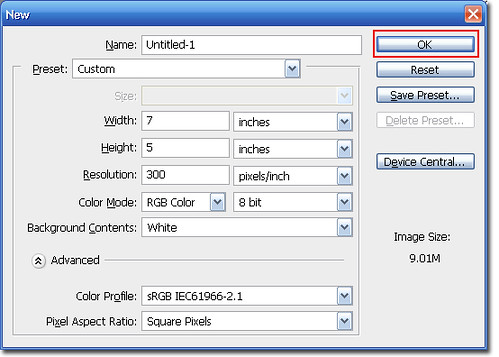
Step 1 Open Photoshop and create a new Canvas: Ctrl + N or File > New. The canvas should be the following setting:
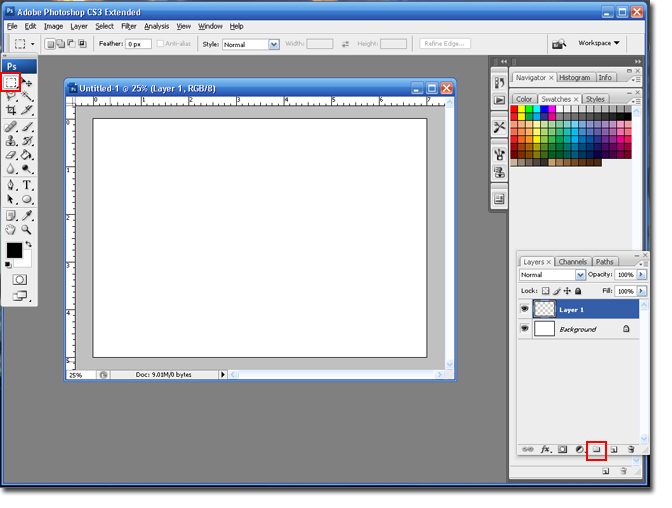
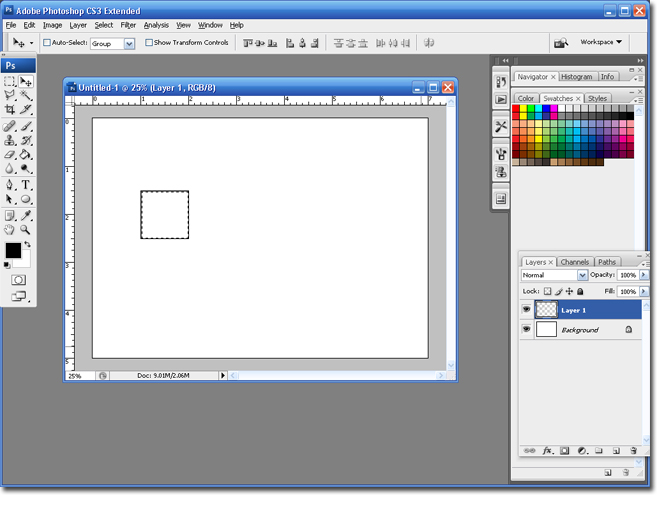
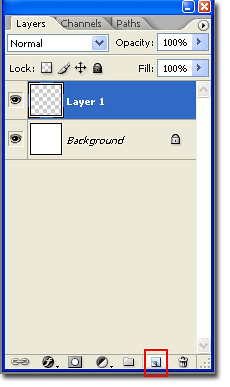
Step 2 Create a new layer and select the Marquee tool.
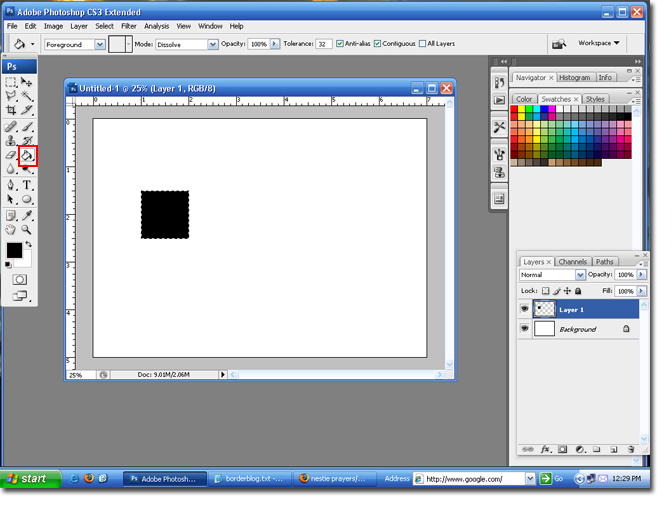
Step 3 Draw a square 1 inch x 1 inch. Draw the square by left-clicking on the mouse and dragging it to the right.

Note: You can turn the rulers on by hitting Ctrl + R.
Step 4 Select the Paintbucket tool and click on the canvas to fill in your color.
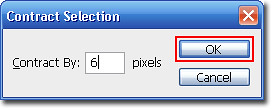
Step 5 Go to Select > Modify > Contract.

Step 6 Set the contact size to 6 pixels, and then click the Ok button to save the settings.
Step 7 Hit the delete button button on your keyboard and follow steps 5 and 6.
Step 8 Select the Paintbucket tool and click on the canvas to fill in your color. Select Ctrl + D to deselect (remove the Dancing Ants).
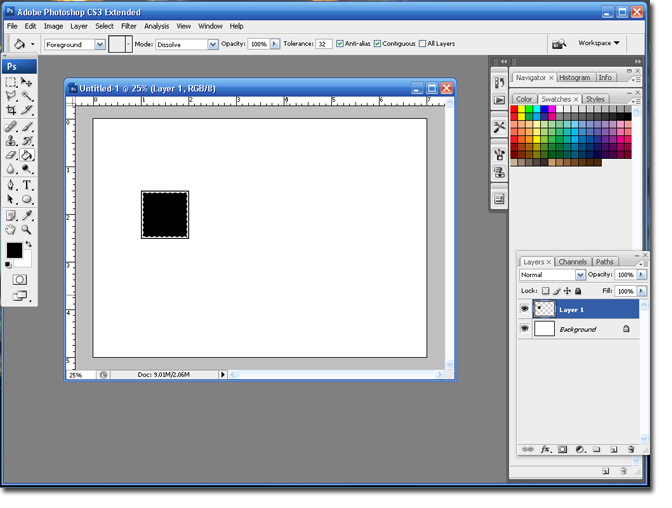
Your Smaller square is finished.
Step 9 Select the Type Tool, set the font to Times and the size to 90.
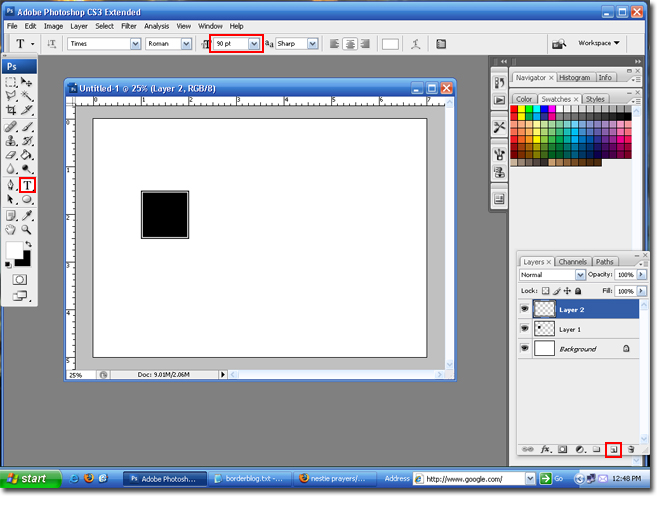
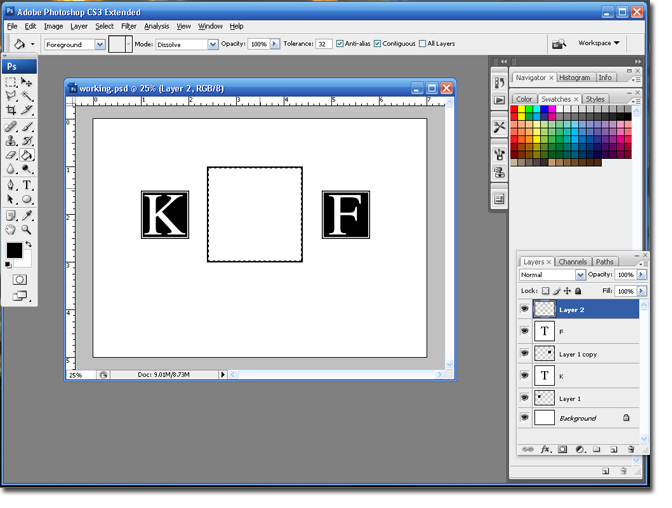
Step 10 Type in the first letter of the Bride's name. Depending on the letter you use, you may need to adjust the size to better fit in the box.
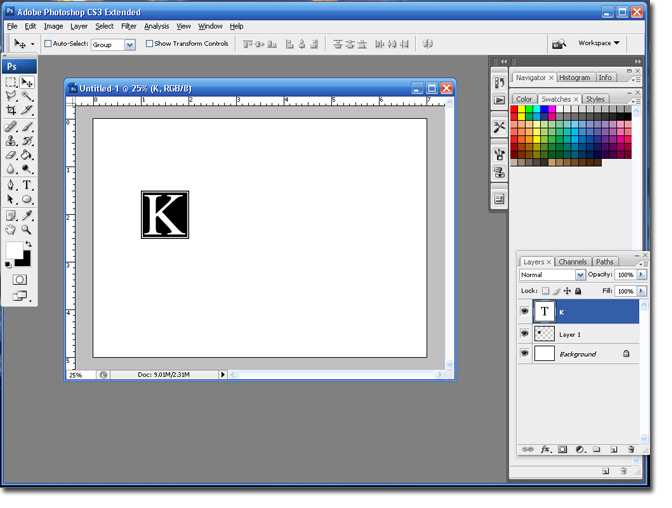
Step 11 In the layers pallet; select the layer with the box and the layer with the first initial. Hold down the Ctrl button to select both layers at the same time. They will both appear blue.

Step 12 Drag those layers to the Add New Layer icon. This will duplicate both layers.

Step 13 Select the Move Tool and hold down the Shift key. Move the 2nd box and initial to the right. Make sure to leave enough room for another box, in the center.
Step 14 Select the Type Tool and highlight the second letter and change the letter to the Groom's first name letter. Click on the Green Check when you are finished.
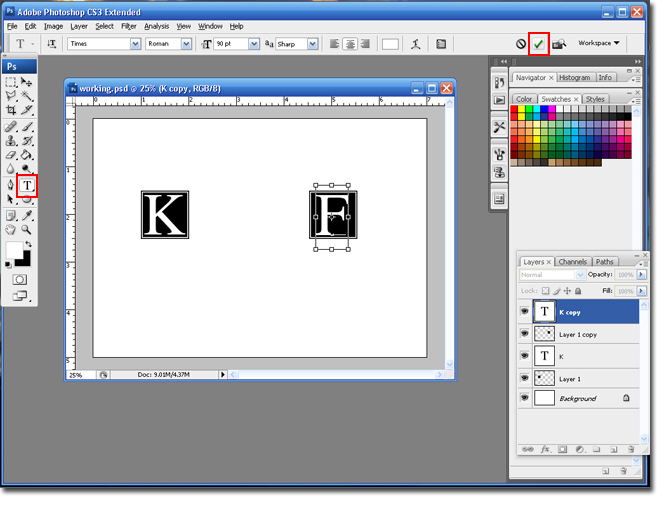
Your second Box is Finished!
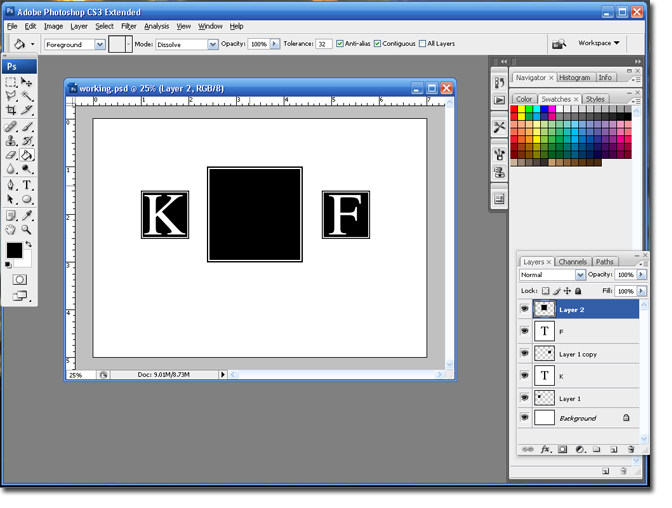
Step 15 Add a new layer and select the Marquee Tool.
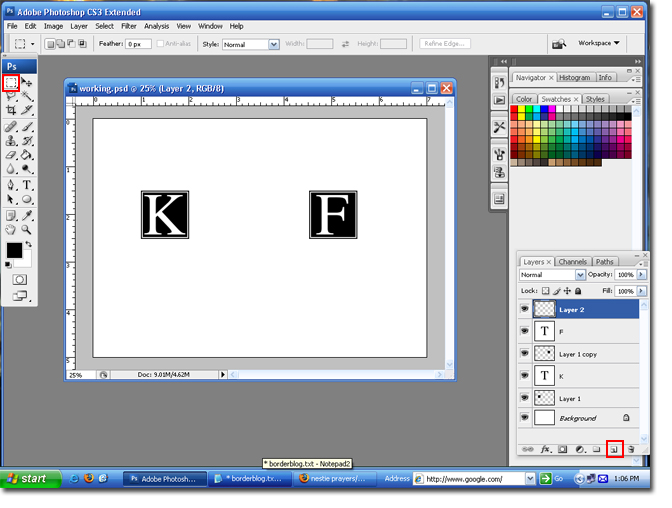
Step 16 Draw a square 2 inches x 2 inches. Select the Paintbucket Tool and fill in the square.
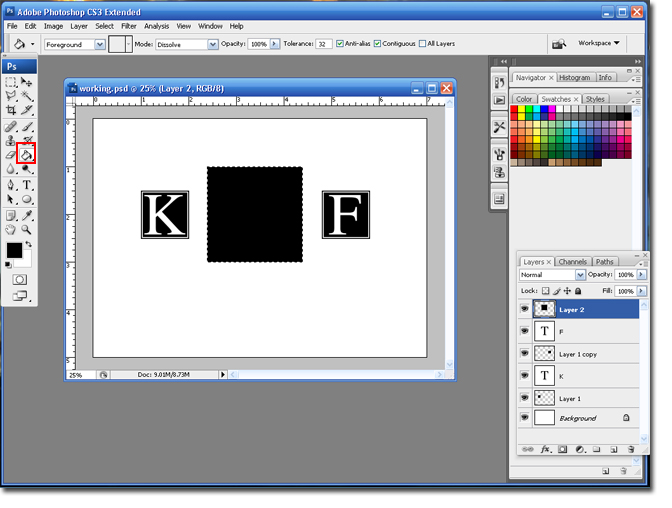
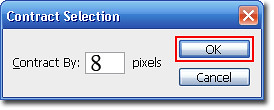
Step 17 Go to Select > Modify > Contract.
Step 18 Set the contact size to 8 pixels, and then click the Ok button to save the settings.
Step 19 Hit the Delete button on your keyboard.
Step 20 Follow Steps 17 & 18.
Step 21 Select the Paintbucket Tool and fill in the square.
Step 22 Select the Type tool, set the font to Brock Script, or another script font and set the size to 120.

Note: Depending on the letter you may need to adjust the size of the font.
Step 23 In the third box; type in the first initial of the groom's last name.

Step 24 Select the Crop Tool and trim your canvas.
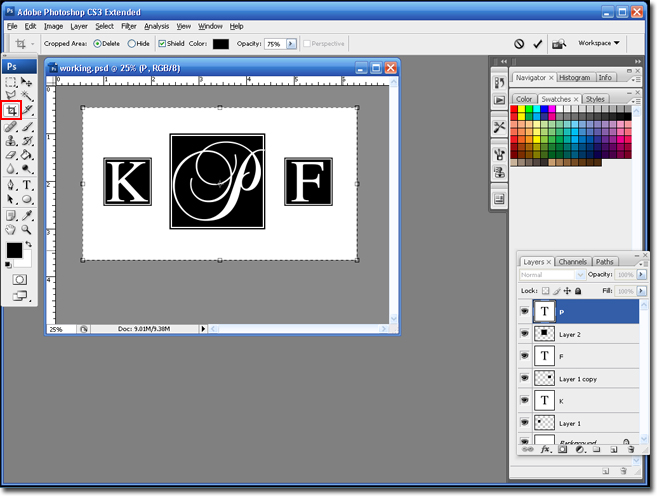
You are finished!
There are a lot of steps to this tutorial, but don't get discouraged. It may seem like a lot of steps but they are pretty easy and very similar.
Good Luck!
So here is the design that we are going for:
Step 1 Open Photoshop and create a new Canvas: Ctrl + N or File > New. The canvas should be the following setting:
Step 2 Create a new layer and select the Marquee tool.
Step 3 Draw a square 1 inch x 1 inch. Draw the square by left-clicking on the mouse and dragging it to the right.
Note: You can turn the rulers on by hitting Ctrl + R.
Step 4 Select the Paintbucket tool and click on the canvas to fill in your color.
Step 5 Go to Select > Modify > Contract.
Step 6 Set the contact size to 6 pixels, and then click the Ok button to save the settings.
Step 7 Hit the delete button button on your keyboard and follow steps 5 and 6.
Step 8 Select the Paintbucket tool and click on the canvas to fill in your color. Select Ctrl + D to deselect (remove the Dancing Ants).
Your Smaller square is finished.
Step 9 Select the Type Tool, set the font to Times and the size to 90.
Step 10 Type in the first letter of the Bride's name. Depending on the letter you use, you may need to adjust the size to better fit in the box.
Step 11 In the layers pallet; select the layer with the box and the layer with the first initial. Hold down the Ctrl button to select both layers at the same time. They will both appear blue.
Step 12 Drag those layers to the Add New Layer icon. This will duplicate both layers.
Step 13 Select the Move Tool and hold down the Shift key. Move the 2nd box and initial to the right. Make sure to leave enough room for another box, in the center.
Step 14 Select the Type Tool and highlight the second letter and change the letter to the Groom's first name letter. Click on the Green Check when you are finished.
Your second Box is Finished!
Step 15 Add a new layer and select the Marquee Tool.
Step 16 Draw a square 2 inches x 2 inches. Select the Paintbucket Tool and fill in the square.
Step 17 Go to Select > Modify > Contract.
Step 18 Set the contact size to 8 pixels, and then click the Ok button to save the settings.
Step 19 Hit the Delete button on your keyboard.
Step 20 Follow Steps 17 & 18.
Step 21 Select the Paintbucket Tool and fill in the square.
Step 22 Select the Type tool, set the font to Brock Script, or another script font and set the size to 120.
Note: Depending on the letter you may need to adjust the size of the font.
Step 23 In the third box; type in the first initial of the groom's last name.
Step 24 Select the Crop Tool and trim your canvas.
You are finished!
Monday, March 10, 2008
Dots in a Circle Monogram
I am so into dots right now. They are perfect for a contemporary monogram design. So, I have decided to do a tutorial to show you how to create a monogram like the logo on my personal blog FabBriannaNichole.blogspot.com. Which, btw, has lots of photoshop tutorials on how to edit pictures.
Here is the look that we are going for:

Step 1 Open Photoshop and create a new Canvas (Ctrl + N or File > New). Use my settings.

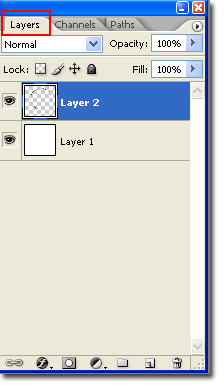
Step 2 Click on the Add New Layer icon, to add a new layer.
Step 3 Select the Ellipse Tool and select Paths (the square at the top with a pen in it).
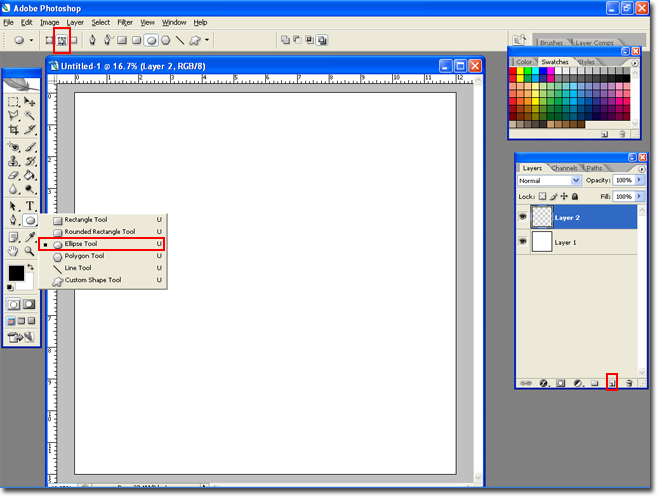
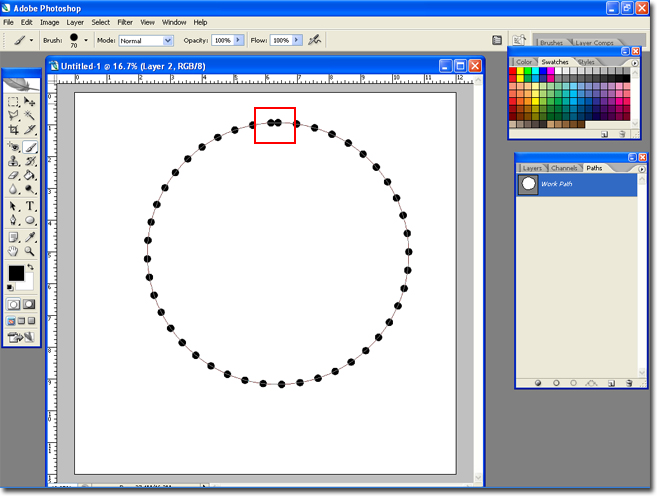
Step 4 Hold down the Shift key and draw a circle. Holding the shift key will constran the proportions. Select the Painbrush tool and set it to hard edged brush about 70 pixels.
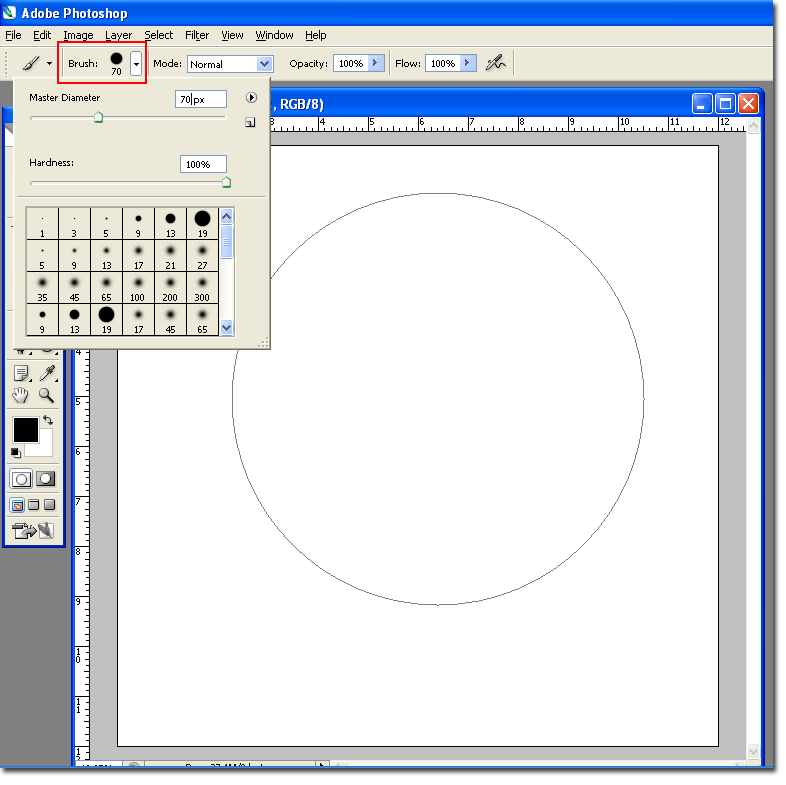
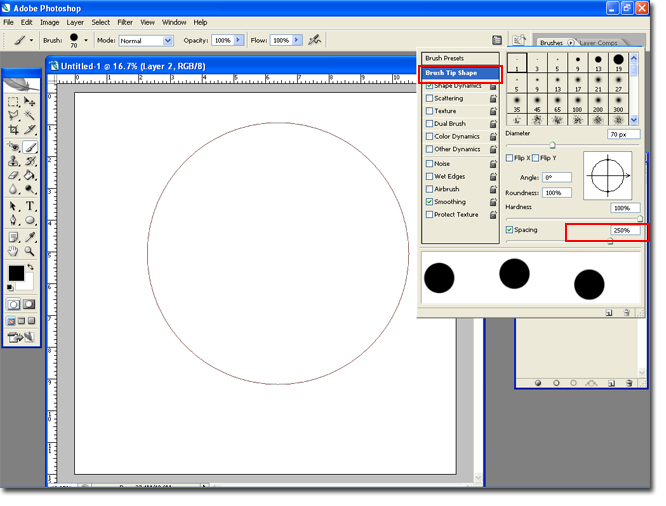
Step 5 Hit F5 or go to Window > Brushes to open the bush settings.

Step 6 Highlight Brush Tip Shape. Change the Angle to 0% and Set the Spacing to around 200%.
Step 7 In the Layer Pallet window select the Paths tab. Click on the Open Circle icon at the bottom. Your dots should appear.
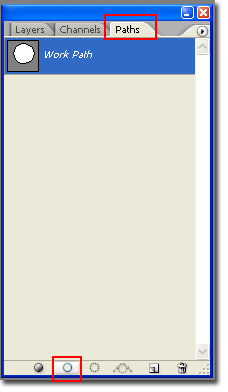
Note: The dots in your circle may not be spaced correctly. If so; hit Ctrl + Z. This will undo the last action. Go back to the brush settings (f5) and change the spacing. Keep doing this until your dot spacing is perfect.
Step 8 Select the WorkPath layer and drag it to the trash can. This will get rid of the line between your dots. Select the Layers tab.
Step 9 Select the Ellipse tool, and change the type to Shape Layers, create a new layer and draw a circle smaller than the one you already created. Remember to hold down the Shift button.
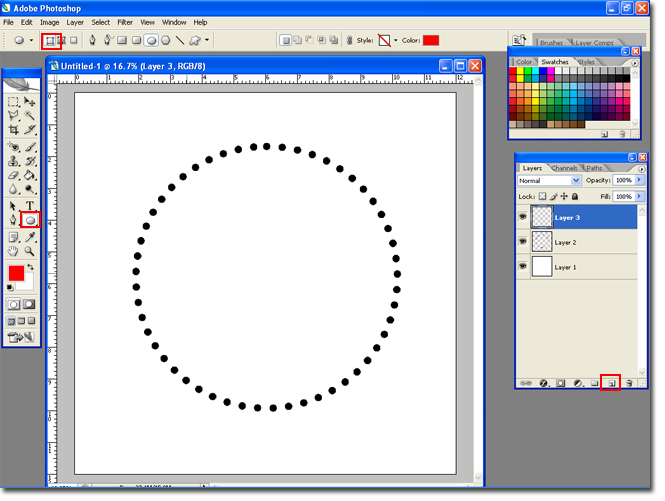
I made mine red, feel free to use any color you like.

The rest of the steps are up to you. Use your imagination and make a totally unique monogram, or copy the one I created.
Step 10 Follow the pervious steps to create another circlee of dots in another color. Use the Move tool to move it down a little, like in my monogram.

Just add some text and you are finished.
Hope you enjoyed the monogram tutorial,
Brianna!
Here is the look that we are going for:
Step 1 Open Photoshop and create a new Canvas (Ctrl + N or File > New). Use my settings.
Step 2 Click on the Add New Layer icon, to add a new layer.
Step 3 Select the Ellipse Tool and select Paths (the square at the top with a pen in it).
Step 4 Hold down the Shift key and draw a circle. Holding the shift key will constran the proportions. Select the Painbrush tool and set it to hard edged brush about 70 pixels.
Step 5 Hit F5 or go to Window > Brushes to open the bush settings.
Step 6 Highlight Brush Tip Shape. Change the Angle to 0% and Set the Spacing to around 200%.
Step 7 In the Layer Pallet window select the Paths tab. Click on the Open Circle icon at the bottom. Your dots should appear.
Note: The dots in your circle may not be spaced correctly. If so; hit Ctrl + Z. This will undo the last action. Go back to the brush settings (f5) and change the spacing. Keep doing this until your dot spacing is perfect.
Step 8 Select the WorkPath layer and drag it to the trash can. This will get rid of the line between your dots. Select the Layers tab.
Step 9 Select the Ellipse tool, and change the type to Shape Layers, create a new layer and draw a circle smaller than the one you already created. Remember to hold down the Shift button.
I made mine red, feel free to use any color you like.
The rest of the steps are up to you. Use your imagination and make a totally unique monogram, or copy the one I created.
Step 10 Follow the pervious steps to create another circlee of dots in another color. Use the Move tool to move it down a little, like in my monogram.
Just add some text and you are finished.
Hope you enjoyed the monogram tutorial,
Brianna!
Friday, February 1, 2008
Power Point Monogram Tutorial
So, I tried to sit down and create a tutorial on how to create monograms in Power Point. I thought it might be helpful for all those girls who do not have a copy of photoshop. Turns out there is already a really great video tutorial on how to do this. I'm not usually a fan of video tutorials, but this one is really easy to follow. Power Point Monogram Tutorial.
Hope you all find it helpful!
BriannaNichole!
Hope you all find it helpful!
BriannaNichole!
Subscribe to:
Posts (Atom)